
How to Get Free Control Panel for VPS Hosting

By Arshath | November 2, 2022
Managing a fast-phased VPS, with our Free control panel which takes away the complexity and helps to manage things at ease. You can manage all the functions you want to do from this free control panel single interface. It simplifies each task that we find difficult on other panels.
You need to wait for configuration after purchasing the order placed for the VPS server and then, choose the operating system you want to be installed. After all these, you need to purchase the control panel separately without knowing better knowledge of it or support from the web hosting for setup installed in the server through the command line.
But we will remove all these hard-fought tasks that you have to go through which we round up to one single setup i.e., Ordering the VPS hosting with free control panel. Then leave everything to us and we have made an automatic setup process that will be done in less than a minute or two and will receive the whole credentials through the registered mail id with SeekaHost.
So why do have to wait, let’s see what the free control panel offers to be that much worth for VPS hosting package and start your purchase with the clear practice of it.
The top features highlighting the Free control panel are:
- Open-source free control panel
- Not related to Linux knowledge
- Separates the server and domain admins’ access
- Command line API
- Advance backup option
Facets of Free Control Panel for VPS Hosting
-
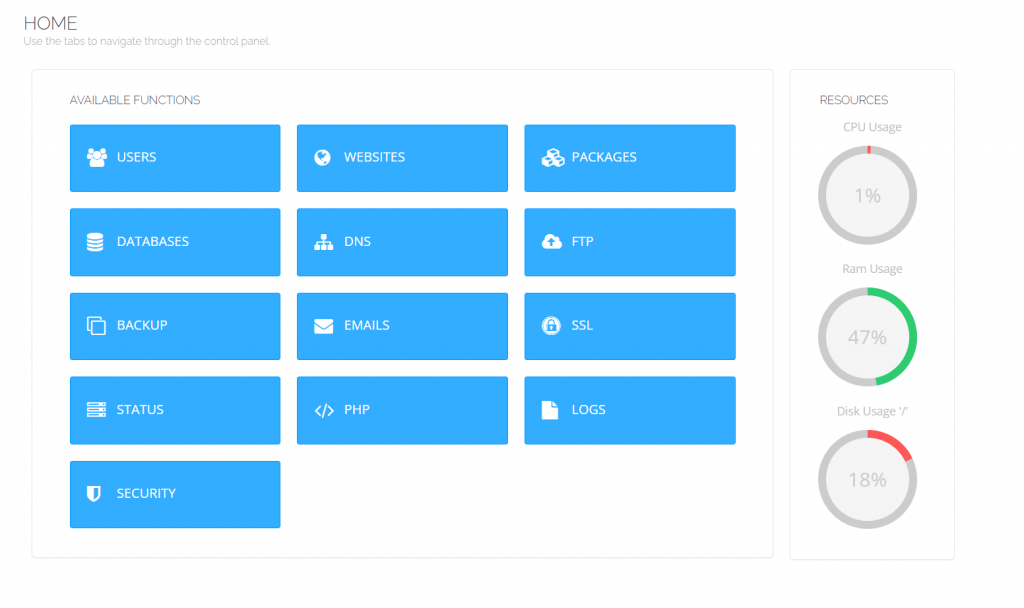
Overview (Free Control Panel)
On the overview page, you will have a dashboard to display the available functions on the panel along with other options such as Version management, a Design option to change the interface colour, and Connect and Community option for support.
-
Main
-
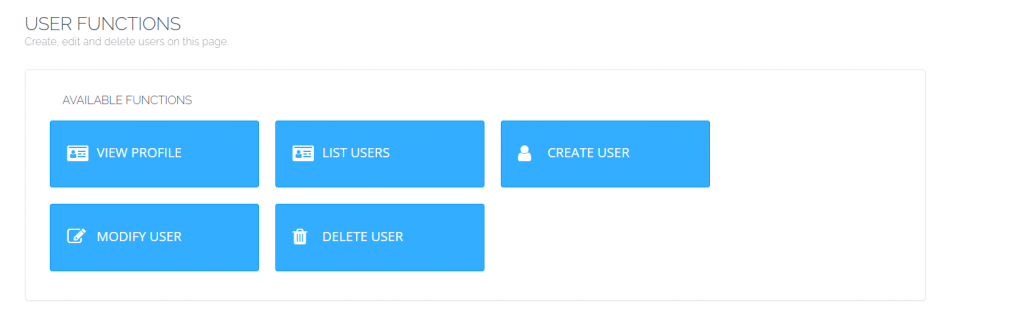
Users:
This User option will let you handle users you are gonna add to access your server and manage users that have already been added. Here, you will have the options as below,
-> Create user – New user with new access and limits.
-> Modify user – Change the password or name with 2factor authentication
-> Create a new ACL – Complete access management to both user and admin or reseller.
-> API Access – Enable or Disable the access completely to the server.
-> Then have other options like modifying, or deleting the user.
-
WordPress:
You have the website deployment start from here with the on-click installation along with the restore backup from the local computer or remote.
-
Websites:
When you have a server you need websites to allocate resources and use the server rightly. Check the below options under it:
-> Create Website – Manually create a website to store separate data for it.
-> Create a New Domain – Website to act as a child domain under the main domain name.
-> Modify Website – Assign package, set owner and PHP version for it.
-> Suspend/Unsuspend – Just suspend or unsuspend when needed to stop live action.
-> Other features are deleting and listing websites/domains.
-
Package:
When you have users, you need to allocate a certain portion of your resources to them to be able to store their data within that limit. To do that, create a package with limited resources and assign them to it.
-> Create Package – Create a package with resources allocation and a database with FTP accounts
-> Other options are listing, deleting, and modifying packages. -
Database:
Make a database connected to your website to store your data in that so that data can be fetched from the server using the database if visitors visit the website.
-> Create Database – Create a database with a separate username and password for it.
-> You can delete and list the database created and also view the whole tables in a database in the PhpMyAdmin. -
DNS:
Now manage the Domain Name System with your control without having to ask for the hosting provider to change the nameserver or add records.
-> Create Nameserver – First and foremost, create a nameserver of two and point an IP/A record to it.
-> Add/Modify DNS Zone – You can add or modify or delete the records in the DNS zone editor.
-> Cloud flare – To point to the Cloud flare nameserver, you have a separate option to point to.
-> Configure default nameserver for the domain, add/delete the zone and records.

-
Email:
If you want to receive any updates or notifications for the websites from the server, you must create an email account where you will receive all the emails with the alert you have set up.
-> Create Email – Mention the mail id to be created under the domain name.
-> Email Forwarding – Forward the emails from one account to another account.
-> Change password – To change the password for the email account
-> Access webmail, email debugger, DKIM manager, delete and list email are other options you will get under the email option. -
FTP:
To access or transfer the files of the website through FTP software, create an FTP account specifically for the websites and it will become easy.
-> Create FTP Account – Mention username, password and specified path if needed for the website which is different from other passwords created before in this panel.
-> Delete and list the FTP account that has been created already to manage it. -
Backup:
When you run a website live, loss of data or content is unavoidable without any backup. This option will exactly provide you with that option with their tool without any plugin to generate a backup and restore the backup that has been generated.
-> Create Backup – Generate a backup for current website content and specify your path to store the file.
-> Restore backup – You can also restore the backup using the backup generated here already.
-> Add/Delete destination – Manage the destination for the backup.
-> Schedule backup – As with the cron job, you can schedule backup for generating periodically as you want.
-> Setup Google Drive Backup – Link your google drive account and the backup generated through google drive.
-> Remote Backup – Sync with remote server access and restore the backup from that server to this cyber panel server.

-
Incremental backup:
Take a backup that only copies data that has been changed or created Between the backups conducted.
-> Backup Website – To take backup separately, can you this option?
-> Schedule Backup – IF you have already one, locate that backup in the specified destination you want remotely or localhost with each separately.
-> Other options available are add/remove destinations, restore backup. -
SSL:
You can now issue your SSL let’s encrypt without even having to ask or wait for the SSL to be installed or run on the server.
-> Manage SSL – Issue your SSL for the domain
-> Hostname SSL – Issue separately for hostname and SSL
-> Mail Server SSL – Issue SSL for mail server.
-
SERVER (Free Control Panel)

Below are the complete server features that have been given to you each has to be handled with care as it will affect the whole websites that have been hosted on this server. You can access logs, and install versions for PHP. Install security and manage it, configure mail settings etc.
- Root File Manager
- Cloud Linux
- Containerization
- Tuning
- Server Status
- PHP
- Logs
- Security
- Mail Settings
- Manage Services
- Plugins
Buy Free control panel for VPS Hosting
If you need to get the above features on the free control panel, go straight into the Cyberpanel VPS Hosting packages on our website with the best price in the market.
Read more about CyberPanel Hosting here -> The Free Control Panel for VPS Hosting
Hope the above will get you to cheer up and build your website with a separate server virtually with us.
ALSO READ:
- How to buy SeekaHost VPS hosting with Free CyberPanel
- How to install WordPress in Cyberpanel of SeekaHost VPS Hosting