
How to Create a WordPress Staging Site?

By swetha | April 27, 2022
Do you want to Create a WordPress Staging Site? This article will explain what is staging, how to create it, and the benefits of a staging site.
What is a Staging Environment?
The Staging environment is used to test your website before making it live. You can create a copy of the website and make your website plugins updates and other updates before it lives.
For example, if you update a plugin, but somehow it gives errors on your website. If this happens, it will affect your website’s reputation. So having the staging site will give you safety. You can make any changes to your staging website and test it.
The Benefits of Using a Staging Site
- You can create better websites
- Getting to know the user experience beforehand
- Save Time from spending errors on live site
- Without affecting the live website, you can clear the errors and bugs
- Can test it by using your own codes
Steps to Create a WordPress Staging Site:
Step 1: Log in to the SeekaHost India Client area by entering your registered mail id and Password. In the client area itself, you can manage all your WordPress operations.

Step 2: Once you logged in, select the package from the “Your Active Products/Services” field or select the “Services” and move on to your WordPress Hosting Package

Step 3: After entering into your WordPress Package, select the WordPress Management under the “Actions” menu.

Step 4: Here you will see the all WordPress Installation of your website. Click the symbol as mentioned in the below image to manage.

Step 5: You will see the installation details and other options now. Click the “Staging” option under the Action menu.

Step 6: A popup window will open, there you have to mention the details to create the staging site.
Protocol – Select the protocol type for the staging website from the dropdown field.
Domain – Enter your domain to install the Staging environment.
Directory – Enter the directory name to store the staging website files.
Database – Enter the Database name of your staging website.
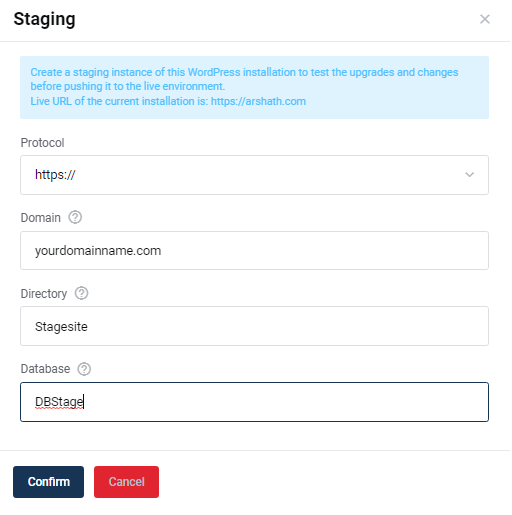
Step 7: Finally click the Confirm button. That’s it, your staging site was created.
You can check the installation details in the WordPress Installation menu. Go back to the Installation menu and see the URL as mentioned while creating the staging.

Again click the symbol as per the above image, You will redirect to the Page mentioned in step 5.
There select the control panel to log in to your WordPress dashboard.

Once you have made all changes in the staging, then you can push the staging site to the live site.
You will see the new popup window there. Before clicking “Confirm” you can use customize option to select the what are things that you want to apply to the live website.
After customizing click “Confirm” to push the website live.
You should have received the installation details in your registered email id(Check in the folders like spam and junk also) or if you need any help, you can contact us immediately through the live chat or ticket.