
How to Configure Cloudflare DNS for a Domain?

By Aravindhan | March 18, 2022
Simple Steps to Configure Cloudflare DNS for a Domain
Want to Configure your Domain to Cloudflare? – Before configuring a domain to Cloudflare, We will see what is Cloudflare and why configuring the domain to Cloudflare.

What is Cloudflare?
Cloudflare is a free Content Delivery Network (CDN) type of product that protects against threats (such as SQL injection and identity theft). Cloudflare is Founded by Matthew Prince in 2009.
Why you should configure a domain to Cloudflare?
Cloudflare improves site performance and speeds up loading times by using their multiple data centers that are located around the world. The Cloudflare network acts like a giant VPN. Giant VPN means that the website visitor will access your website by being physically redirected to the closest server. This is unique to Cloudflare.
Configure the Domain to Cloudflare:
Before Configuring the domain to Cloudflare, you have to create a Cloudflare account. Now we are going to see how to create an account and how to configure a website to Cloudflare.
Steps to create a Cloudflare account
Cloudflare account takes less than 5 minutes to sign-up. Below are the following steps to create a Cloudflare account.
Step 1:
Sign up Cloudflare account.
Click here to Sign up Cloudflare account.

Step 2:
Enter your Email address and Password.
Step 3:
Click Create Account.
Once your account is created successfully, Cloudflare asks you to add a site to Cloudflare.
These are the steps for Creating a Cloudflare account.
How to Configure Cloudflare DNS?
Here, We will see how to configure a domain to Cloudflare. Follow the below steps.
Step 1:
Log in to your Cloudflare account.
Step 2:
Click on Add site in the top navigation bar.

Step 3:
Enter your website’s root domain and click Add Site. For example, if your website is abc.com, type abc.com.

Step 4:
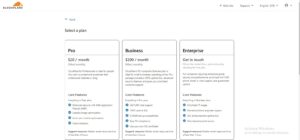
Select the Cloudflare plan level and click Continue.
Step 5:
After selecting the Plan, Cloudflare Automatically attempts to identify the Domain DNS record.

Step 6:
After DNS identification, Review whether all DNS records were identified in the DNS query results window.

Step 7:
After Reviewing the DNS records Click Continue.
Step 8:
In Change your Nameserver window, Copy the Cloudflare name server which is displayed, and click continue.

Step 9:
Click Done Check Nameserver. After that Finish the domain setup and activate the domain on Cloudflare.
After Activating the domain, Update the Cloudflare Private Name Server details (refer to Step 8) in Domain Registrar.