SeekaHost WordPress Website Management – Complete Guide

By Arshath | October 18, 2022
Manage WordPress using the Seekahost Toolkit
What you have heard all over the internet about what is WordPress Website Management, WordPress and creating a website using WordPress is about “It is a free Open source and can create a website easily where even beginner with no coding knowledge can do it”.
So, when all going crazy over creating a website, managing it on their own but no one even considers thinking about how all the things inside it are being managed.
You know even an expert in that field will find it difficult to deal with the management unless with the help of hosting providers.
So, we made a proper toolkit to manage that function for your WordPress Hosting website from your SeekaHost client area itself without login into the actual panel or softaculous.
NOTE: This toolkit can be used only if you have WordPress hosting package with us. So, buy now and enjoy this feature.
Let’s get into the client area to know the toolkit for WordPress Website Management!
Below are the WordPress Website Management options you will go through this entire article to get an idea beforehand:
Under Management:
-
-
-
-
- Installation Details
- Website Details
- Backups
- Themes
- Plugins
- Config
- Users
-
-
-
Under Actions:
-
-
-
-
- Control Panel
- Clear Cache
- Clone
- Update
- Change Domain
- Manage Auto Upgrades
- Staging
- Push To Live
- SSL
- Maintenance Mode
- Instance Image
- Delete
-
-
-
Step by Step process for WordPress Website Management from the Client Area:
Client Area login and WordPress Manage:
Step 1:
Click “Login” by entering the valid Credentials.
NOTE: Click “Remember Me” to save details to log in directly next time.
Step 2:
Click the “Services” section and click on the WordPress Product name which you have brought with us from “My Product and Services” shown.
Step 3:
You will get to see details of your WordPress Hosting. Now click “WordPress Management” from the left side under the “Actions” Section.
Step 4:
On this WordPress Installation Page, click the “Edit Installation Details” icon in the right corner between the three.
Now the WordPress Installation Setup options will be displayed.
All the options will be on the left side.
Installation and Website Details:
-
-
- Under Installation details,
You can see the complete installation setup details of your WordPress. You can also hover over each detail and click on it to access the respective pages. - Under Website Details,
You can see how your website gets displayed if it is accessed from the Desktop and Mobile.
- Under Installation details,
-
Backups:
Backup (a copy of the webistes data’s) is the most important part of the website where it comes to rescue our site when we don’t know what will happen to our site anytime for any reason. Always have the backup on regular interval basis.
Click “Create Backup” and choose all the backup files (also can choose specific files) with the location where you want to store them.
Now click “Confirm” and refresh after 5 seconds to display the backup file.
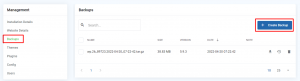

You can Download, Restore and Delete that backup file from the three options shown in the right corner.

Install/Manage Theme:
“Theme is the complete design for a website on how it should be displayed live. So, choose a theme that could fit perfectly for your website content. You can change the theme at any time.”
Click the “Theme” option. You will have two options – Installed and Add New.
-
-
- Under “Installed”, you can see a list of themes you have installed on your website.
- Under “Add New”, you can search for the theme you want and click enter.
- Now select the theme in the check box and click the “Install” icon on the last right corner and click “Confirm”.
- Go to the “Installed” option and click,
“enable” to activate the theme,
“update” to upgrade to the latest version released, and
“delete” to permanently delete the theme.
-

Install/Manage Plugin:
Plugins are used to extend or add functionality to the website. If you want to add some feature to show on your website or to improvise the website or anything on your website, you can install plugins related to it.
Click the “Plugin” option. You will have two options – Installed and Add New.
- Under “Installed”, you can see a list of plugins you have installed on your website.
- Under “Add New”, you can search for the plugin you want and click enter.
- Now select the plugin in the check box and click the “Install” icon on the last right corner and click “Confirm”.
- Go to the “Installed” option and click
“enable” to activate the plugin,
“disable” to de-activate the plugin,
“update” to upgrade to the latest version released,
“delete” to permanently delete the plugin.

Manage WordPress config file:
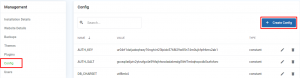
To have a website live without facing any database error, the config file and MySQL database have to be synched to get the required data and store the data on the server.
- Click “Config” to view the wp-config file information which is saved in the public_html folder.
- You will have all the database values here which you can manage by editing, deleting, and creating.
- If you were to add the same database name, you have to delete the old one and then
-> click “Create Config” give the name, and value and choose the type. - If you have created the database on the wp-config file in public_html, the same database will also get displayed here and you can do the changes.

Users:
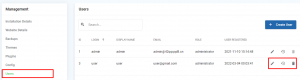
By default, while installing WordPress an “admin” user will be created with a random password set for it. If you want to add more users, you can do so in the following ways:
- Click “Users” to display the user that had been added to the WordPress already.
- You can update, reset the password, delete and create a new user.
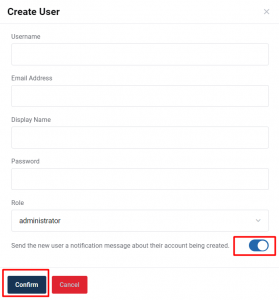
- To add a new user, click “Create User” and give the necessary details.
- If you want that user to receive the notification of account, enable the send notification and then click “Confirm”.
- You can assign the role accordingly where each role will have certain access to your website part.
NOTE: Username and Email address are a must to create a user.
Control Panel:
You can directly log in to cPanel of the website without using the login credentials.
NOTE: It will only work if the nameserver propagation has been completed after updating our nameservers.
Clear Cache:
To clear the cache of the website, you can use this option.
If you made any changes on WordPress and don’t see that result live, click “clear cache” and confirm, so that your changes will reflect live instantly. Because the website may be loading with cached content on servers.
Clone:
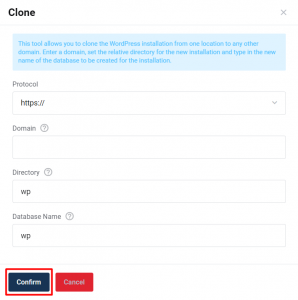
Cloning is like saving a copy image of your original image. If you clone a website, the same website resources will be created, but on what names you have been giving while creating the cloning site.
Here at SeekaHost.in, for that, you don’t need to install any plugin or tools to clone the site which may take more time of yours.
Go through the article here to get more knowledge and step guides on this subject -> https://www.seekahost.in/create-a-wordpress-clone-website/
Update:
To update WordPress to the latest version, click the “Update” option to upgrade it. If already updated to the latest version, it will display the latest version upgraded.
Change Domain:
If you have your domain expired or building the content on a different domain or you don’t want to continue on the current domain, you can click the “Change Domain” option and mention the new domain which you have purchased.
If you want the backup of the old domain content and new domain to be load secure, you can enable both options and then click “Confirm”.
NOTE: To activate the SSL from our end, you need to update our nameservers for your domain hosted with us.

Manage Auto Upgrades:
If you don’t want to manually upgrade the wordpress version, all the plugins and themes each time when the new versions are released, you can enable the respective upgrade options.
NOTE: The auto-upgrade option will work only for the current versions and not for those that were already in old versions.
- Auto Upgrade -> choose either upgrade to the latest version or upgrade to minor versions to update the wordpress.
- Auto Upgrade Plugins and Themes -> Just click enable option.
- Now click “Confirm”.

Staging:
Staging means developing or building a website as a demo model for testing and deploying those changes to your live website.
The process and the details will be the same as you give or mentioned for cloning the WordPress site. But what is the difference is that you can’t make the cloning content replace the live site. But in the staging site, you can make everything get replaced with live site files.
Go through the article here to get more knowledge and step guides on this subject -> https://www.seekahost.in/create-a-wordpress-staging-site/

Push To Live:
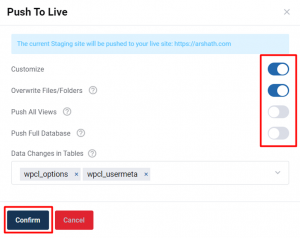
If you made any changes on the staging site, you can click the “Push To Live” option to replace that changes on the live site. This option will only be visible if you have made any changes on the staging site.
Enable “Customize” and under that,
- Overwrite Files/Folders –> To overwrite all the files in the live site with the staging site.
- Push All Views –> To push all the views who are visiting the staging site to the live site.
- Push Full Database –> It will import all the databases from staging and replace them with the live site.
- Data Changes in Tables –> when you made changes on the staging site on certain database tables and want to replace those tables only, you can enable this option.
- Now click “Confirm”.
SSL:
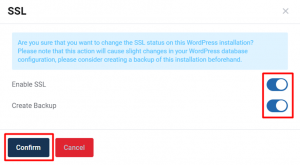
Secure Socket Layer is a security protocol to protect the information of visitors who update their personal info and to protect your site from theft of data by encrypting the link that passes between the web server and web browser. In simple, it helps for both SEO ranking and building customer trust in your website.
- Enable SSL –> To load a website with HTTPS and keep secure.
- Create Backup –> To have a complete backup file of the WordPress site once SSL is activated.
- Now click “Confirm”.
NOTE: To activate the SSL from our end, you need to update the nameserver for your domain hosted with us.
Maintenance Mode:
To keep your website under maintenance, which notifies the visitors that your website is under development, you can use this feature.
Click “change” if you want to activate or deactivate maintenance mode.
Instance Image:
This tool allows you to make this installation save as an instance image, which then can be used to create new WordPress installations.
If you don’t use this installation as an instance image, you can disable “Mark As Image” to stop it.
Here, give the domain FTP login credentials which will be the same as the cPanel credentials, and click “Confirm”.

Delete:
If you don’t want this installation, you click “Delete” and choose which part (database or directory or both) you want to delete. You can delete it at any stage but make sure before confirming it as you can’t retrieve it later on unless you have a backup.

Hope this article will clarify everything about WordPress Management in SeekaHost.