How to setup 301 Redirect in .htaccess file?

By Gowdham | September 7, 2021

A 301 Redirect permanently redirects one URL to another URL, you can use this redirection method if your website is changed or moved to the new one. After the redirection, your old site URL will be moved to the new site URL, so your old domain to send visitors to the new domain. There are different types of redirection among them, 301 redirection is very much useful, it helps the visitors to guide that the content is moved to a new location. Below we will see how to apply the 301 redirect in .htaccess file.
Common uses of 301 Redirects:
Redirecting individual page URL: If you want to redirect the individual page URL into another URL within the same domain, you can apply 301 redirections for this. Enter your domain name in code instead of yourdomain.com
Redirect 301 /old-url https://yourdomain.com/new-url
Redirecting Old domain to new domain: You have changed the domain name but you want to use the same content of your old domain, then you can apply the 301 redirects for the entire domain. Type your old domain name and new domain name instead of oladomain.com and newdomain.com
RewriteEngine on
RewriteCond %{HTTP_HOST} ^olddomain.com [NC,OR] RewriteCond %{HTTP_HOST} ^www.olddomain.com [NC] RewriteRule ^(.*)$ https://newdomain.com/$1 [L,R=301,NC]
How to create or edit the .htaccess file?
Step 1: Log in to your domain cPanel account.

Step 2: Search File Manager in the cPanel, or find the File Manager in the Files section.

Step 3: The File Manager opens in a new tab. Inside that click “Settings” which is on the top right side.

Step 4: The preference page will open. Check the “Show Hidden Files” checkbox and click “Save“. It will show all the hidden files for you.

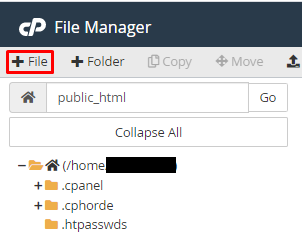
Step 5: Go to the public_html folder in the File Manager window. There you can see the .htaccess file. If it is a new site and the .htaccess file was not there, you have to create it.

Step 6: To create the .htaccess file, Click the +File button at the top right.

Step 7: The New File window will open. Enter the “New File Name” as .htaccess and click “Create New File“.

Step8: Now the .htaccess file will show in the public_html folder. To edit this file, select the file and click Edit Option.


Step 9: The editor window will display where you can edit your code based on your requirement as mentioned above.
Step 10: Once you have done the editing, click the “Save Changes” button on the top right side of the page and close the tab.
![]()
If you are a registered user in SeekaHost and have any queries to be clarified or issues to be sorted, you can raise a ticket through the client area dashboard or email to [email protected]. For immediate interaction or guidelines, contact our support team available in LiveChat at the right bottom corner of the website.
