

How to Fix “Your Connection Is Not Private” Error in Chrome

By Aravindhan | July 24, 2026










The “Your Connection Is Not Private” error is a common problem that you can face when you are visiting a website on the internet. This error occurs when the browser which you are using is unable to verify the website which you are visiting is secured. This error will prevent us from visiting unsafe websites, but this can also appear due to other reasons.
In this article we will look into why this error happens and how to fix this error.

Causes of the “Your Connection Is Not Private” error:
The “Your Connection Is Not Private” issue can occur due to multiple reasons, and understanding this “Your Connection Is Not Private” error helps in fixing it faster.
1. SSL Certificate Expired
2. HTTP to HTTPS Redirection
3. Browser Cache
4. Outdated Browser
5. Incorrect System Date and Time
6. Untrusted Certificate Authority
7. Use a Different network/network cache
8. Malware
9. Proceed Manually
10. Reset Your Network Settings
1. SSL Certificate Expired:
SSL is required for a website to make a secure connection. If the SSL certificate is expired, there is a misconfiguration in SSL, or there is no SSL installed on the website, the browser will display the Your Connection Is Not Private error page while loading the website.
To resolve this we need to check whether the SSL certificate of your website is installed correctly If not, the SSL certificate should be deleted and reinstalled.
Follow the Steps below,
Step 1: Login to the cPanel Account.
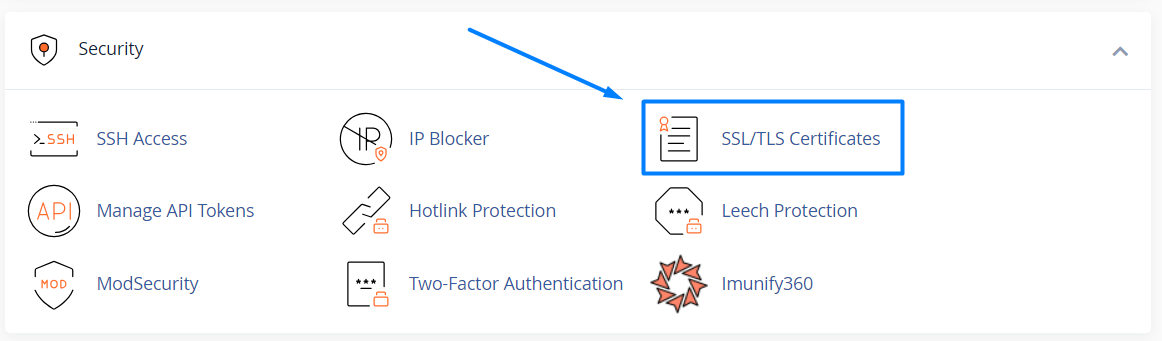
Step 2: Under Security section, click SSL/TLS Certificates option.
Step 3: Click “Wizard” tab.

Step 4: Click all the checkbox near each domain name or select only main domain and *.domain so it automatically take all subdomains. If you are configuring only for main domain and few subdomain, then you can select only those domain names. Click Continue button.

NOTE: If you select wildcard domain, then it will configure automatically for any subdomain you add later under the main domain in cPanel. If you remove and readd the same subdomain, it will not cover the subdomain so you have to select the subdomain and install SSL separately.
Step 5: Now click Let’s Encrypt Certificate button.

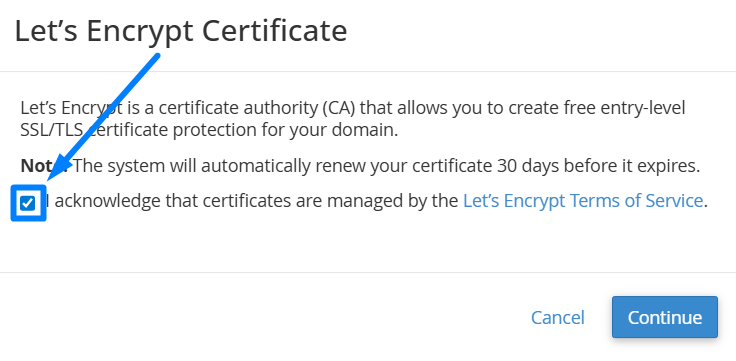
Step 6: Now in the popup window, click checkbox to accept the terms of Let’s Encrypt. Click Continue button.
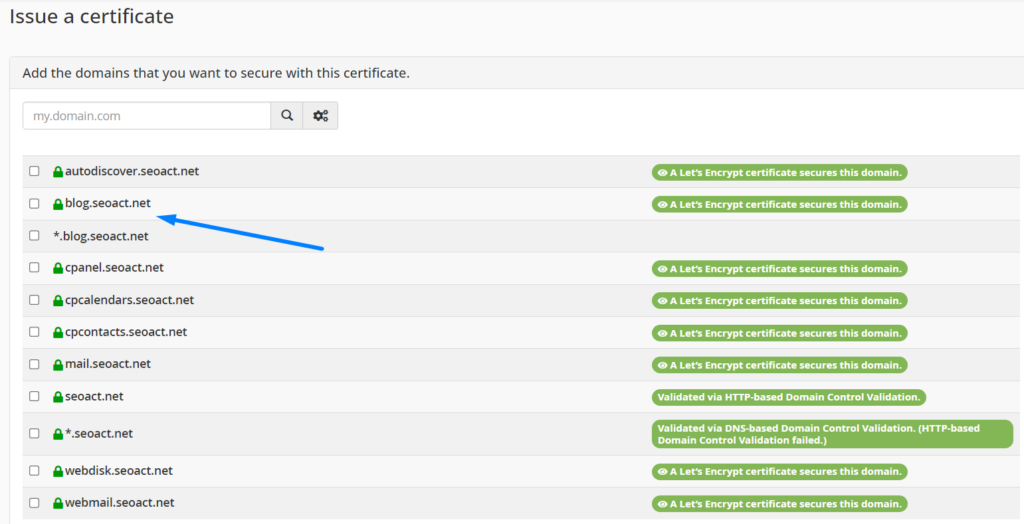
Step 7: Now the SSL certificate will be installed in the cPanel for the website.

Step 8: If you add subdomains after installing the certificate, then the subdomain will be automatically covered under the existing certificate if you have selected the wildcard domain option while installing the certificate.
Step 9: If the website loads with both http and https but you want to load only withhttps, kindly update the URL in phpMyAdmin -> Database -> wp_option and update the website name with HTTPS.
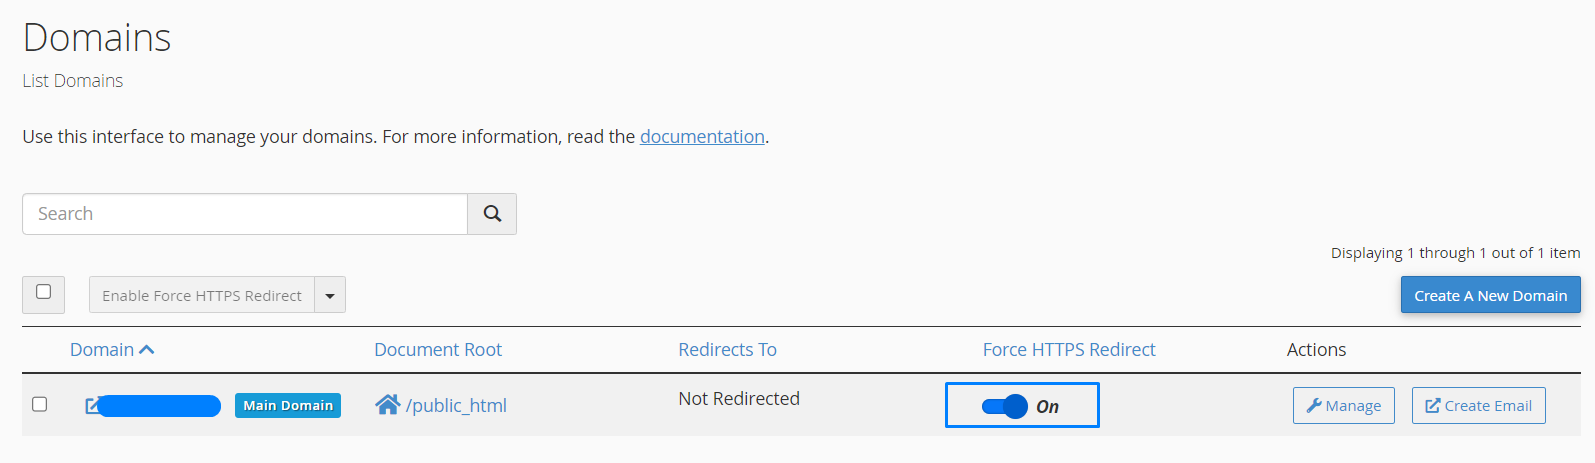
Step 10: Also do force redirect on the “domains” section for the domain to redirect the website from http to https if visitor visit the website on http.
Step 11: If you want to uninstall the SSL certificate, go to Installation tab
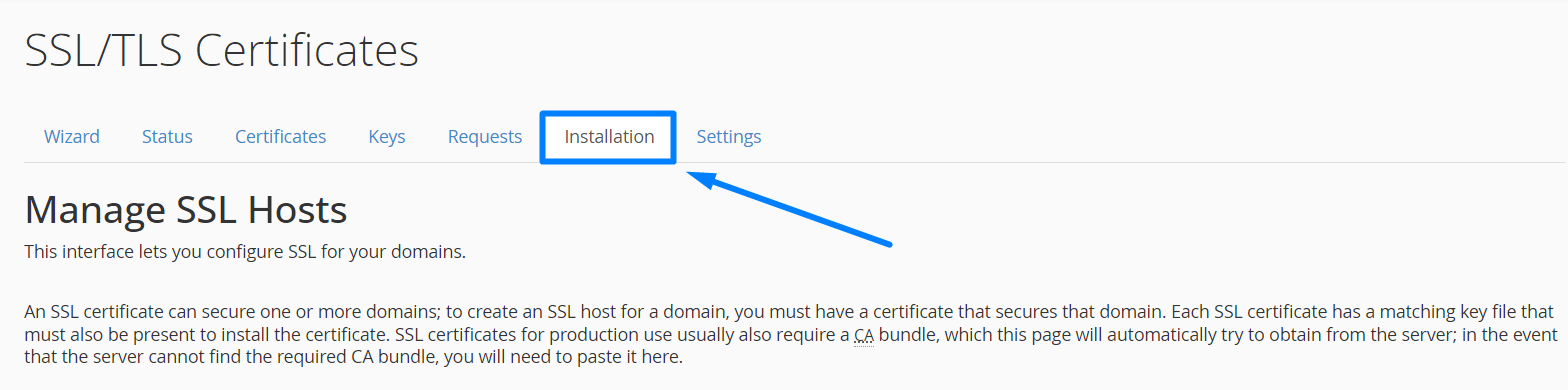
Step 12: Now click “Uninstall” option near the installed certification.

2. HTTP to HTTPS Redirection:
Some times the visitor searching for your website might type the URL using HTTP instead of HTTPS. In such cases the website will load without SSL which makes it unsecured and trigger error “Your Connection Is Not Private”. Setting up a redirection from https to https ensures that the website automatically redirects visitors to a secure connection without facing any error “Your Connection Is Not Private” or insecure.
We can do that in three different ways:
- Domains option in cPanel.
- .htaccess file in file manager
- Using WordPress plugin.
Domains option in cPanel:
Step 1: Login to cPanel -> Domains option.
Step 2: Toggle on near the domain name to enable force https.
.htaccess File in File Manager:
Step 1: Login to cPanel -> Search “File Manager” in the search box.

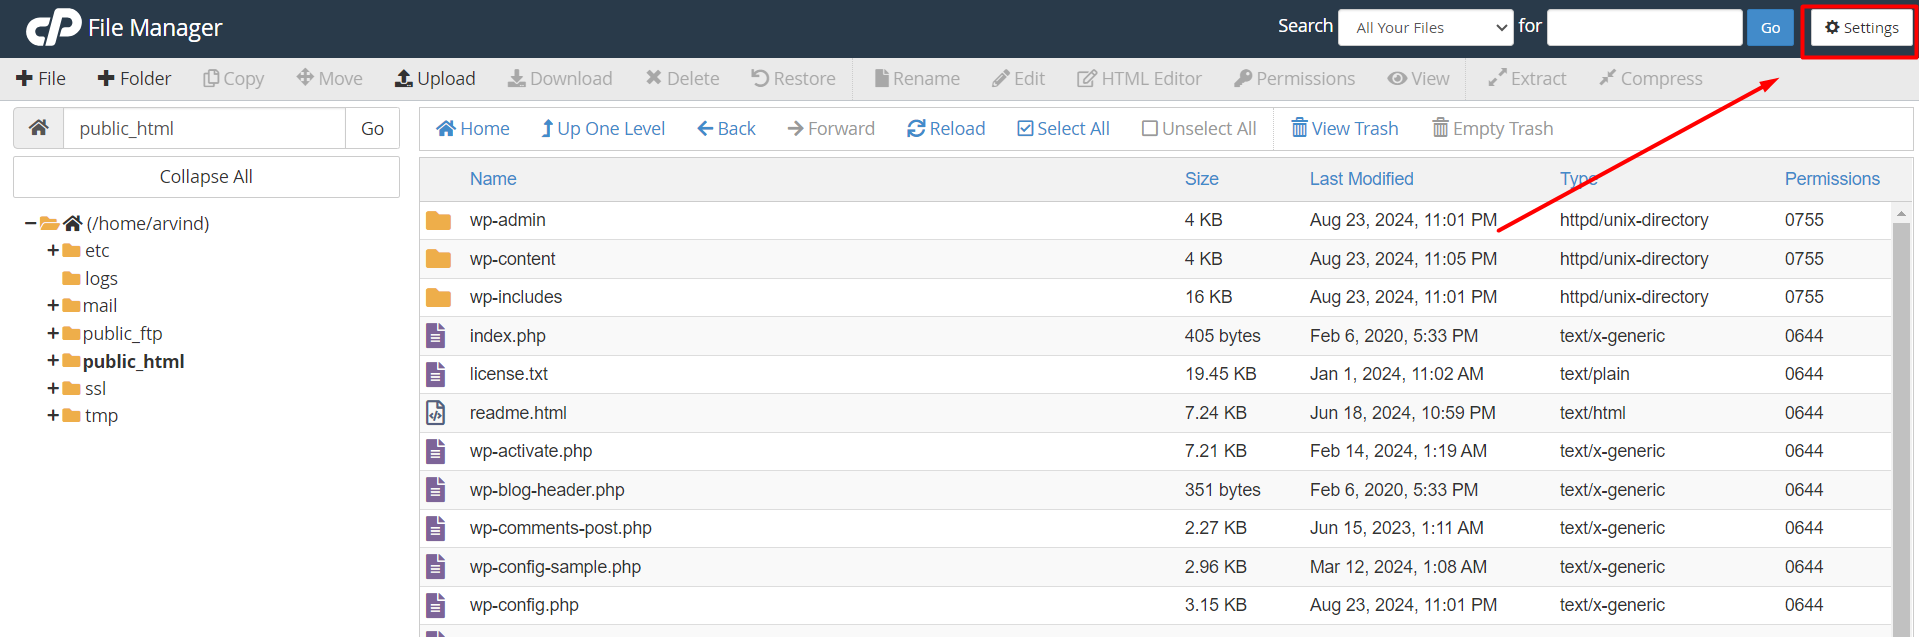
Step 2: Open public_html directory.

Step 3: Click on the settings icon
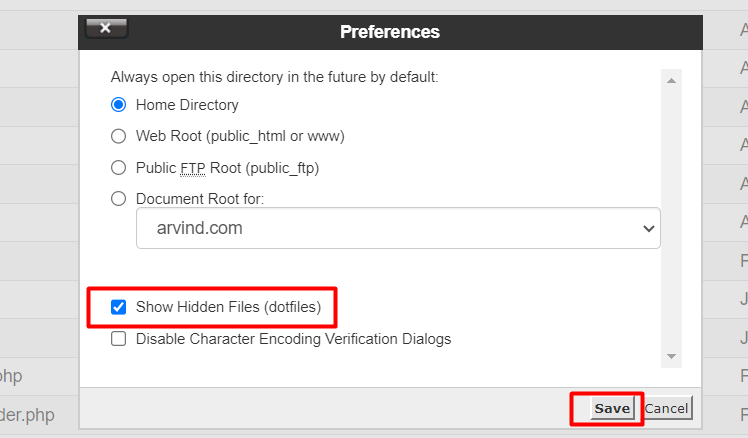
Step 4: Select “Show Hidden Files (dotfiles)” -> save the changes.
Step 5: Right click on the .htaccess file and click Edit option.
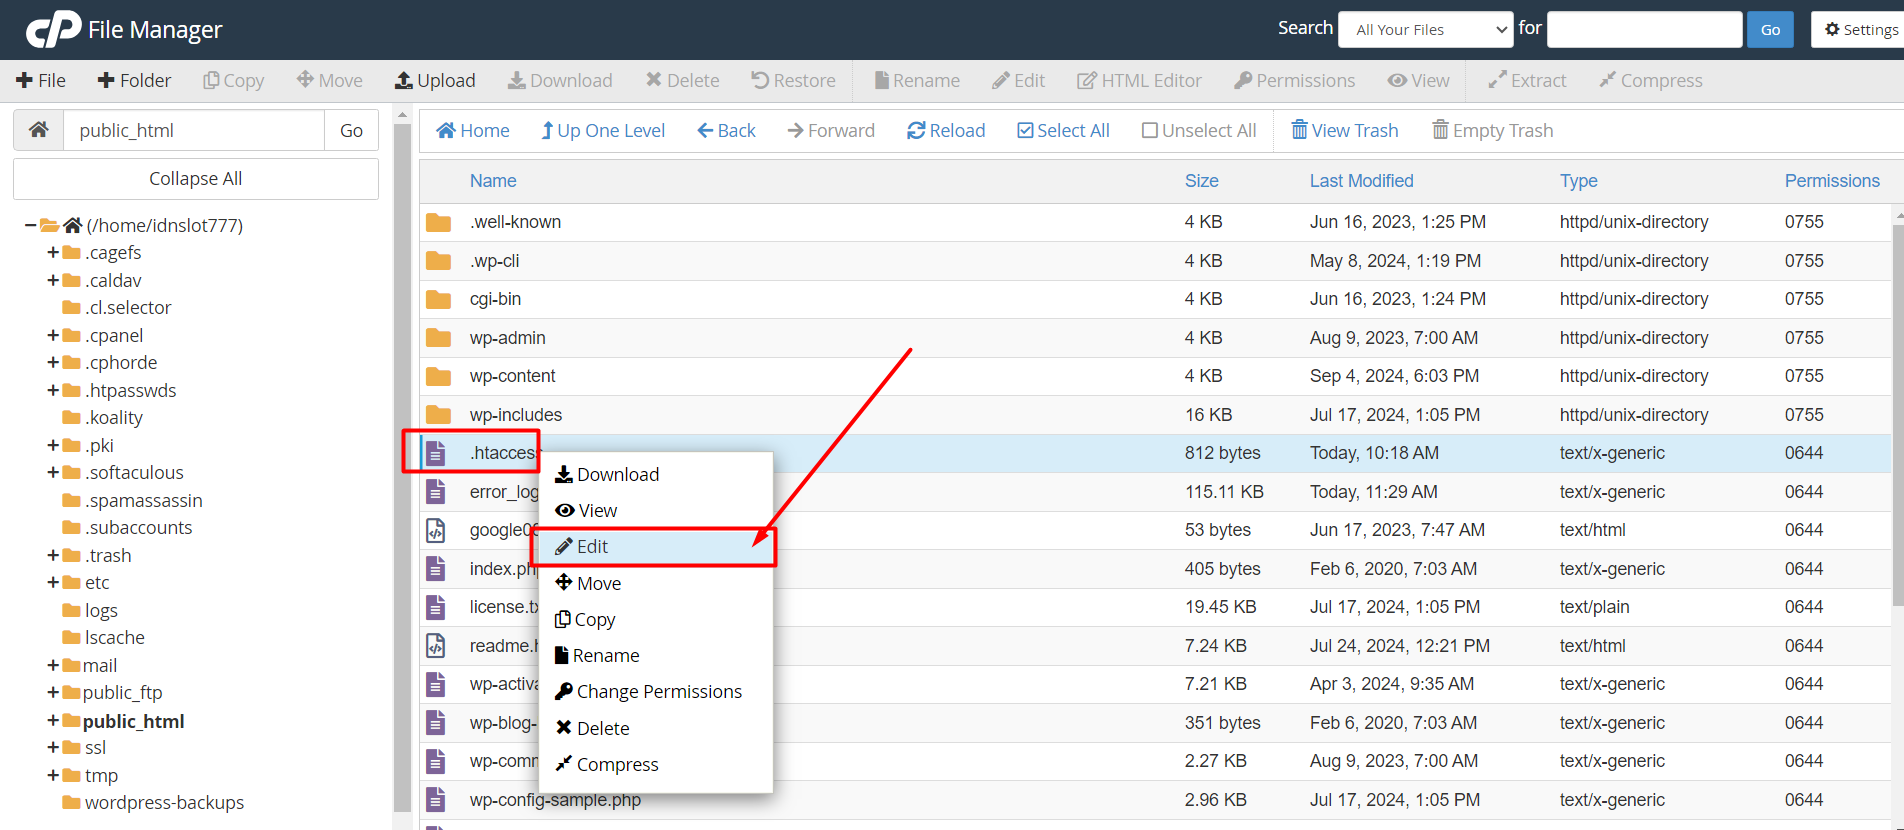
Step 6: Copy and Paste the following code inside the file and save it.
RewriteEngine OnRewriteCond %{HTTPS} off
RewriteRule (.*) https://%{HTTP_HOST}%{REQUEST_URI} [R=301,L]
Using WordPress Plugin:
There are many plugins available to redirect your website from HTTP to HTTPS. Before using any plugin please ensure that your hosting provider has installed an SSL certificate on your domain. Without an SSL certificate installed these plugins will not work.
I have some of the plugins below please check it.
- Easy HTTPS Redirection (SSL).
- WP Force SSL & HTTPS Redirect.
- SSL Insecure Content Fixer.
- Really Simple SSL.
Following are the steps to be followed to make this redirection possible using plugin – Easy HTTPS Redirection (SSL).
Here I have explained the steps using the plugin Easy HTTPS Redirection (SSL). The steps mentioned here may differ slightly from those of other plugins. (the variations are minimal).
Step 1: Login to your WordPress dashboard, go to the “Plugins” section, and click on “Add New Plugin.”

Step 2: Search for the plugin, click on “Install Now”.

Once installed, click on “Activate.”
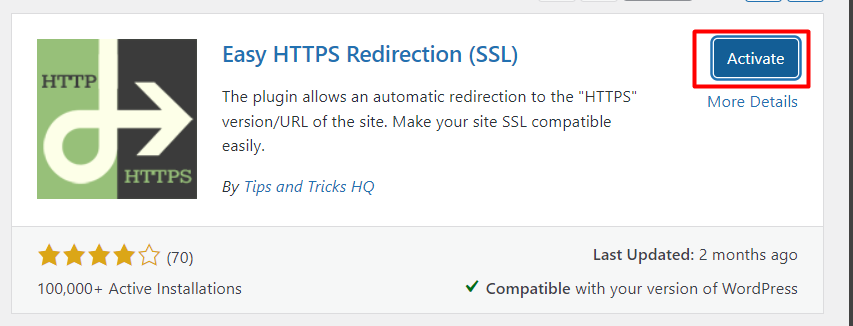
Step 3: After activation, go to the “Settings” section and open “HTTPS Redirection.”
Step 4: Select the checkbox “Enable automatic redirection to HTTPS” and click on “Save Changes.”
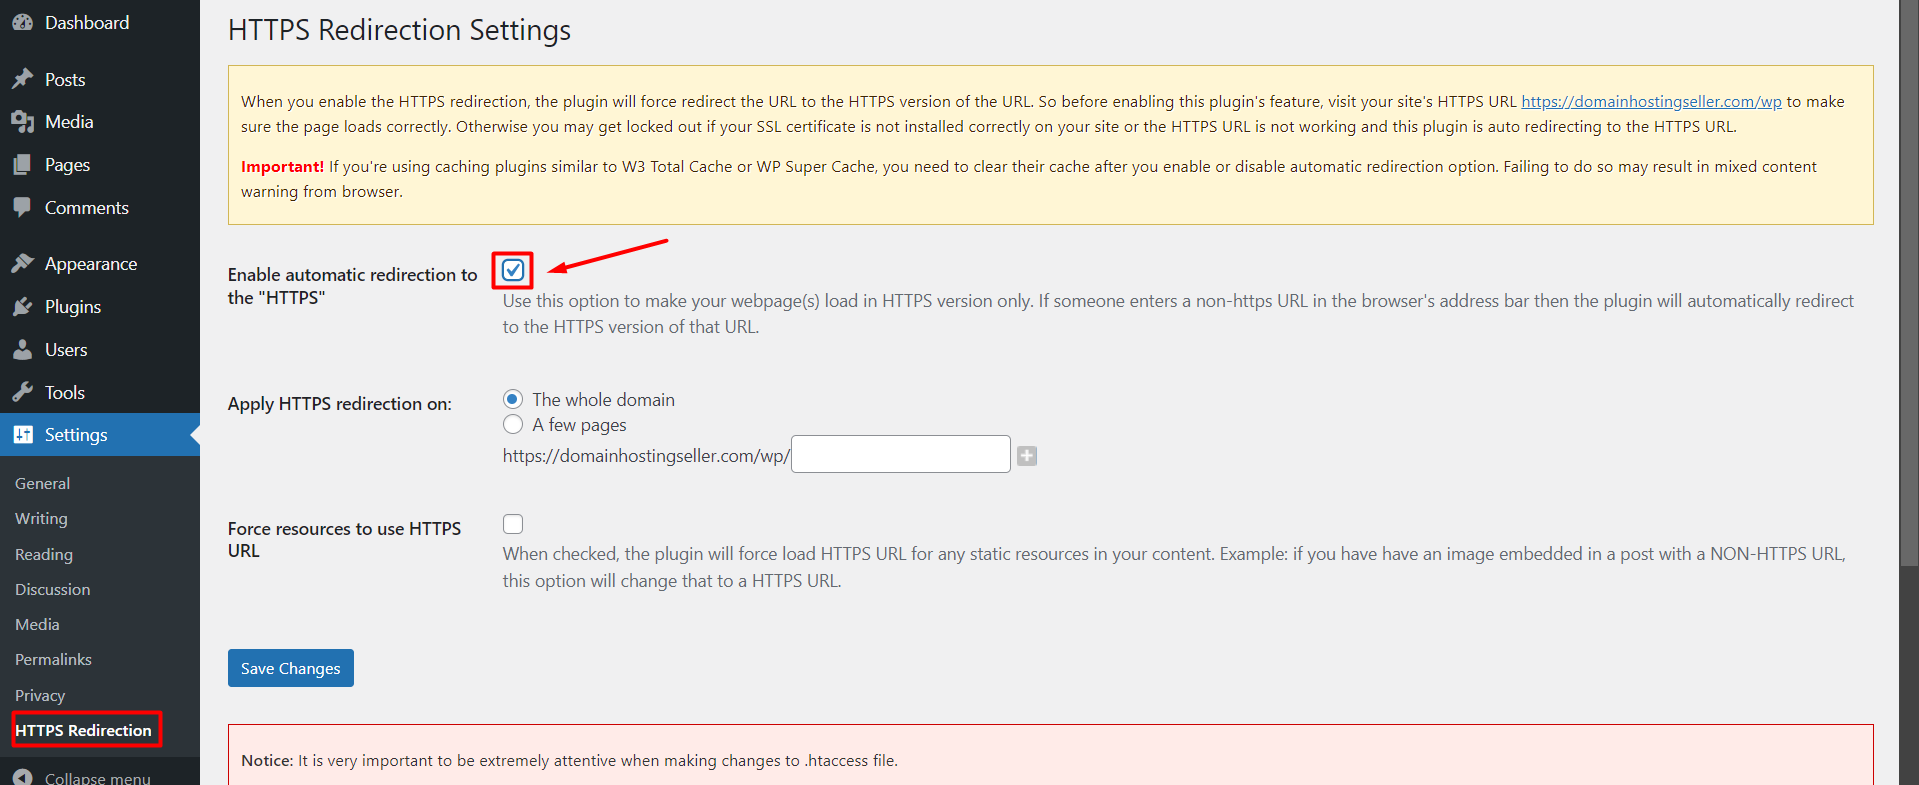
Now your website will get redirected automatically from HTTP to HTTPS.
3. Browser Cache:
Sometimes, this error page may displayed due to browser cache. If our browser’s cache contains outdated or incorrect SSL information may cause this error.
4. Outdated Browser:
For browsers to support the most recent security protocols, they must be updated. More recent SSL certificates might not be recognized by an outdated browser.
5. Incorrect System Date and Time:
SSL certificates are sensitive to time. If the system clock is set incorrectly it might not match the SSL certificate validity period. This also can be the cause of this error.
If the system clock is set incorrectly it might not match the SSL certificate validity period. So ensure that the system time is set correctly.
Windows:
Step 1: Right-click the clock in the taskbar and select “Adjust date/time.”
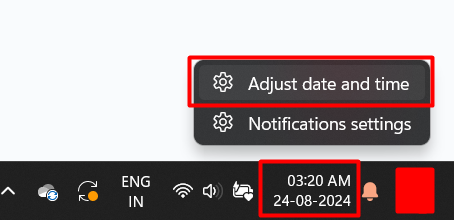
Step 2: Turn on “Set time automatically” and “Set time zone automatically.”

macOS:
Step 1: Click on the Apple menu and go to “System Preferences.”
Step 2: Open “Date & Time.”
Step 3: Enable “Set date and time automatically.”
6. Untrusted Certificate Authority:
If the SSL certificate is provided by an unrecognized authority, browsers may block the connection.
In some cases, the system we are using might be infected with malware, which can also cause this error to appear.
How to Resolve:
Step 1: Reload the website
Sometimes the simplest solution works best. Reload the website by clicking the refresh icon or pressing F5 on the keyboard.
Step 2: Clear Browser Cache
If the browser cache contains outdated or incorrect SSL information, clearing it can fix the issue.
Steps (Google Chrome):
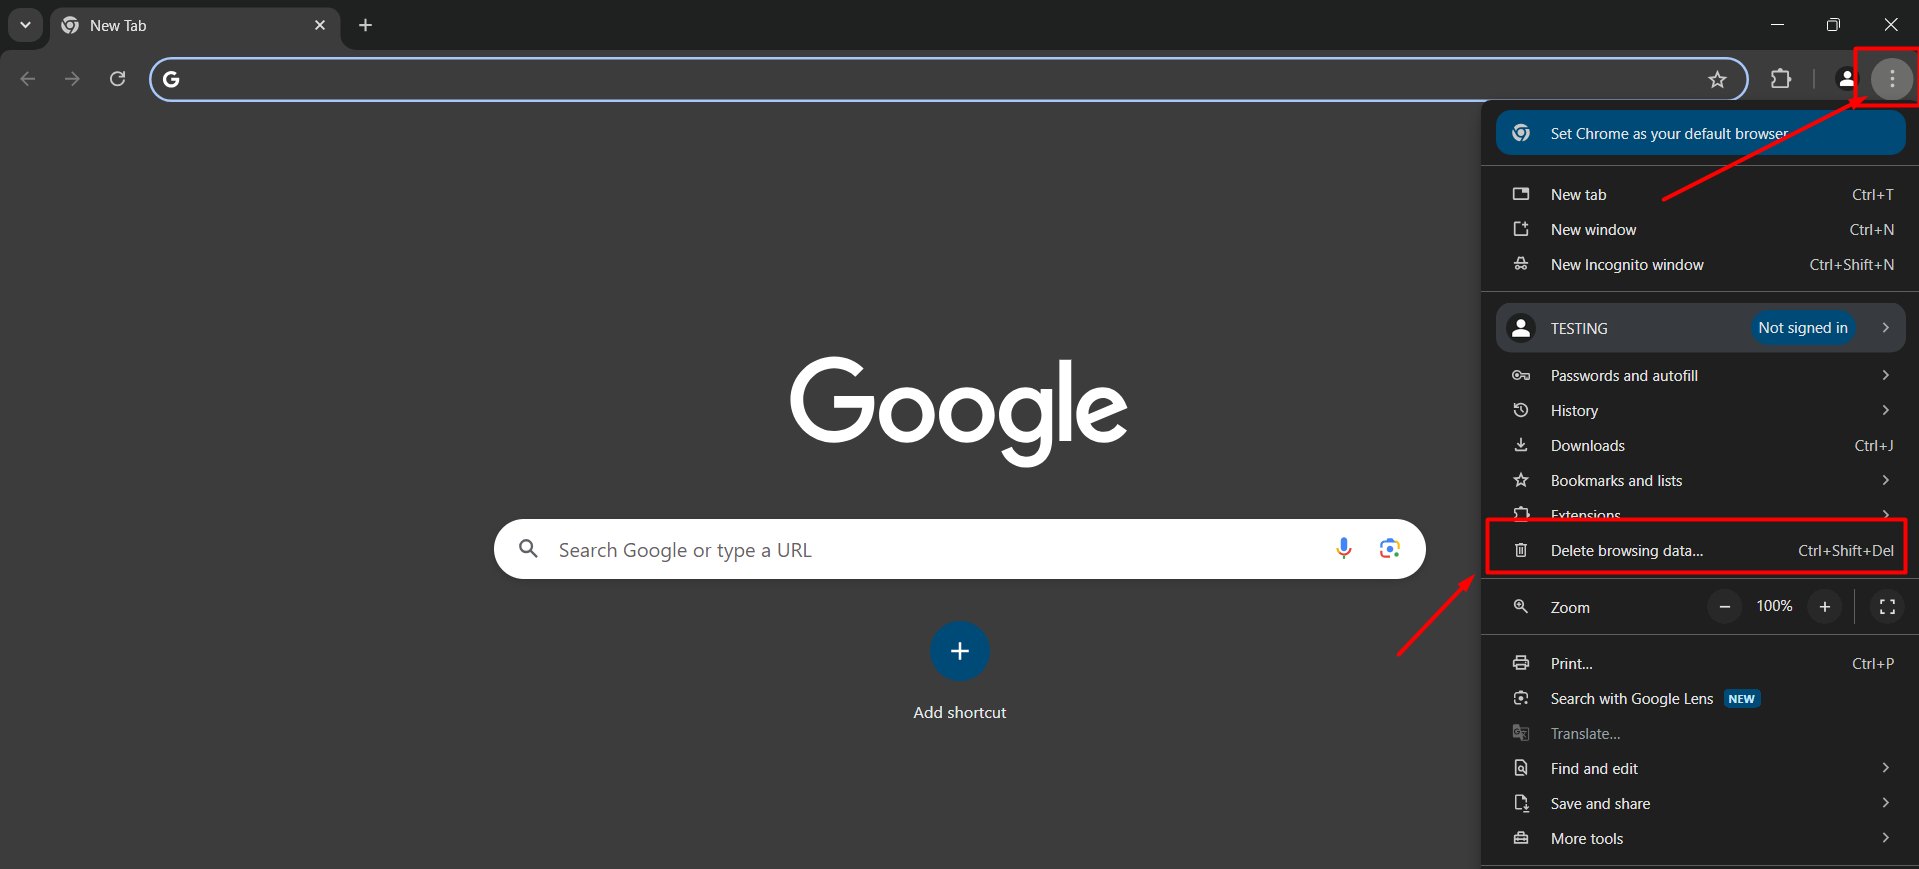
- Click on the three dots in the top-right corner
- Go to “Delete browsing data”
- Select “Cached images and files”
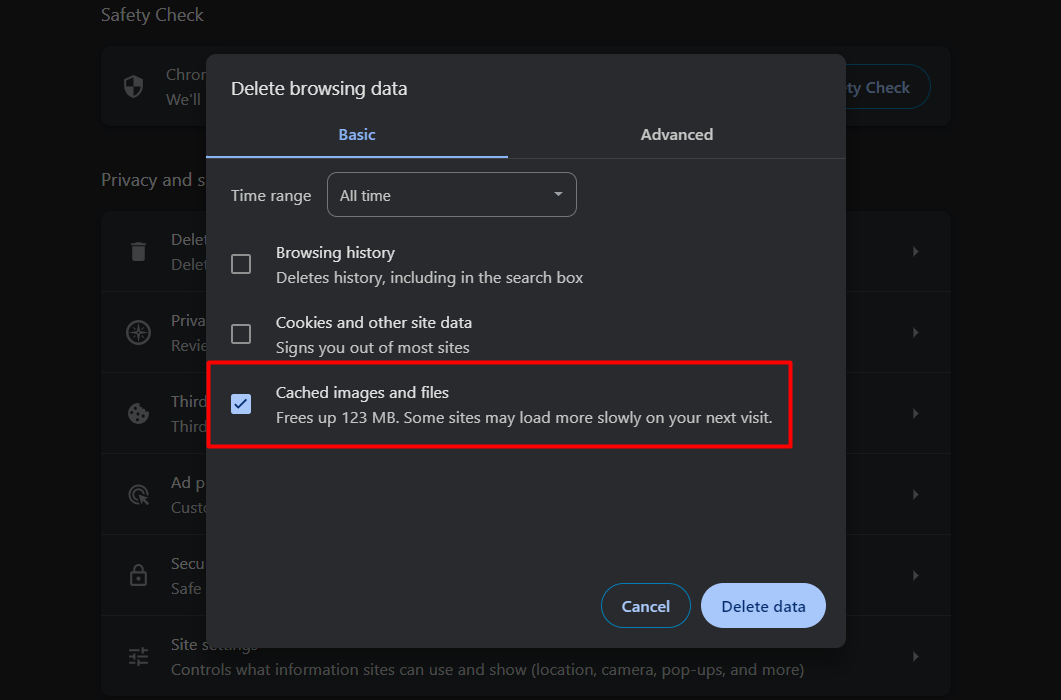
- Click “Clear data”
Step 3: Update Browser
An outdated browser may not support or detect the latest SSL protocols. Make sure your browser is updated.
Steps (Google Chrome):
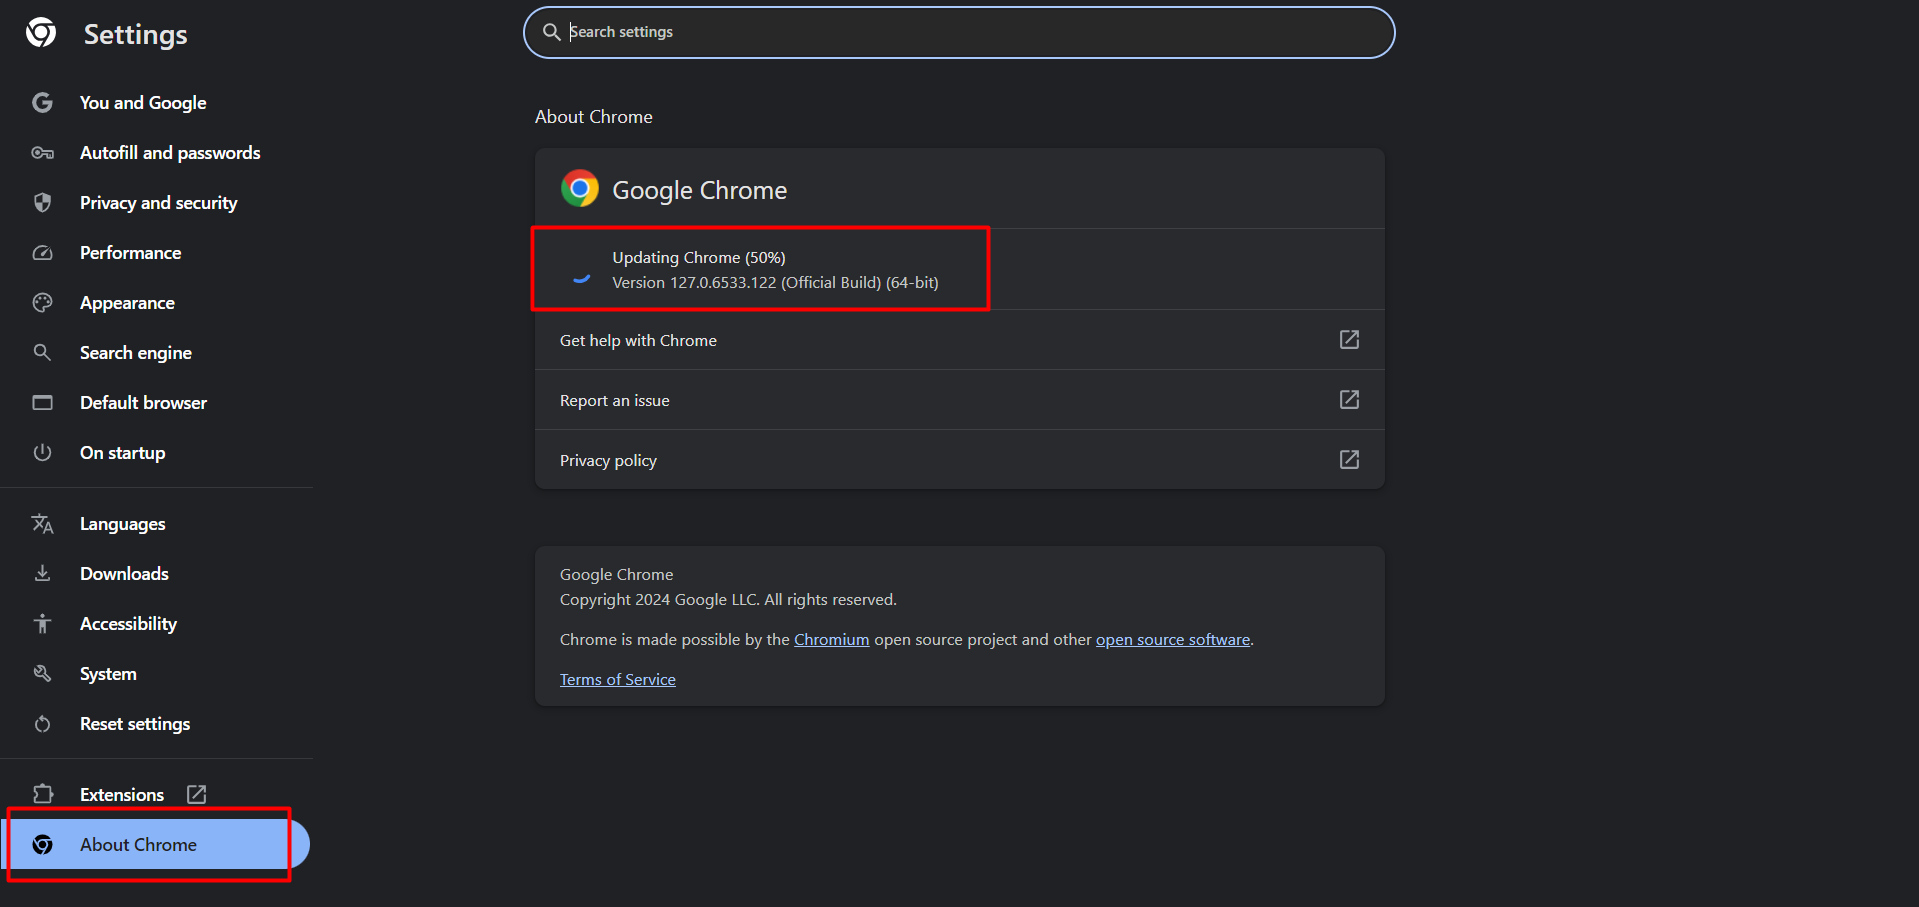
- Click on the three dots in the top-right corner
- Go to “Help” > “About Google Chrome”
- Chrome will automatically check for updates and install them
Step 4: Use a Different Network / Clear Network Cache
Sometimes the issue is caused by network cache. To verify this, try accessing the website using a different network.
If the website loads correctly on another network, it confirms the issue is related to network cache.
To fix this, you can clear DNS cache and temporary files.
Windows (Clear DNS Cache):
- Press Windows + R to open Run dialog
- Type “cmd” and press Enter
- In Command Prompt, type: ipconfig /flushdns
- Press Enter
macOS (Clear DNS Cache):
- Open Terminal (Applications > Utilities > Terminal or Spotlight search)
Commands:
- macOS Catalina and later:
sudo dscacheutil -flushcache or sudo killall -HUP mDNSResponder
- macOS Mojave and earlier:
sudo killall -HUP mDNSResponder
- OS X Yosemite:
sudo discoveryutil mdnsflushcache or sudo discoveryutil udnsflushcaches
Enter your admin password when prompted. No confirmation message will appear, but the cache will be cleared.
Step 5: Clear Temporary Internet Files (Windows)
- Press Windows + R to open Run dialog
- Type inetcpl.cpl and press Enter
- Go to the “General” tab
- Click “Delete” under Browsing history
- Select the data you want to remove
- Click “Delete”
7. Use a Different network/network cache:
Sometimes the error will be displayed because of the network cache, it cannot be resolved by simply clearing the browser cache. To confirm whether the error is displayed because of the network cache, we can check by connecting to a different network.
If the website loads correctly with HTTPS on a different network, it confirms that the problem is with the network cache.
To resolve this we need to clear the network cache, which can be done by connecting to our ISP provider or you can clear the DNS cache and temporary files by following the below mentioned steps.
For Windows:
Step 1: Press Windows + R to open the Run dialog box.
Step 2: Type “cmd” and press Enter to open Command Prompt.
Step 3: In Command Prompt, type “ipconfig /flushdns” and press Enter.

For macOS:
Step 1: Open Terminal (Applications > Utilities > Terminal) or search for “Terminal” using Spotlight (Cmd + Space).
Step 2: Use the appropriate command based on your macOS version:
- macOS Catalina and later: sudo dscacheutil -flushcache or sudo killall -HUP mDNSResponder
- macOS Mojave and earlier: sudo killall -HUP mDNSResponder
- OS X Yosemite: sudo discoveryutil mdnsflushcache or sudo discoveryutil udnsflushcaches
Step 3: Enter your admin password when prompted (it will not be visible while typing).
Step 4: There will be no confirmation message, but the DNS cache will be cleared.
Clear Temporary Internet Files (Windows):
Step 1: Press Windows + R to open the Run dialog box.
Step 2: Type “inetcpl.cpl” and press Enter to open Internet Properties.
Step 3: Go to the “General” tab and click “Delete” under Browsing history.
Step 4: Select the data you want to remove and click “Delete.”

8. Malware:
If there is any malware on your computer can interfere with SSL connections. Run a full system scan using trustable antivirus software to detect and remove any virus threats.
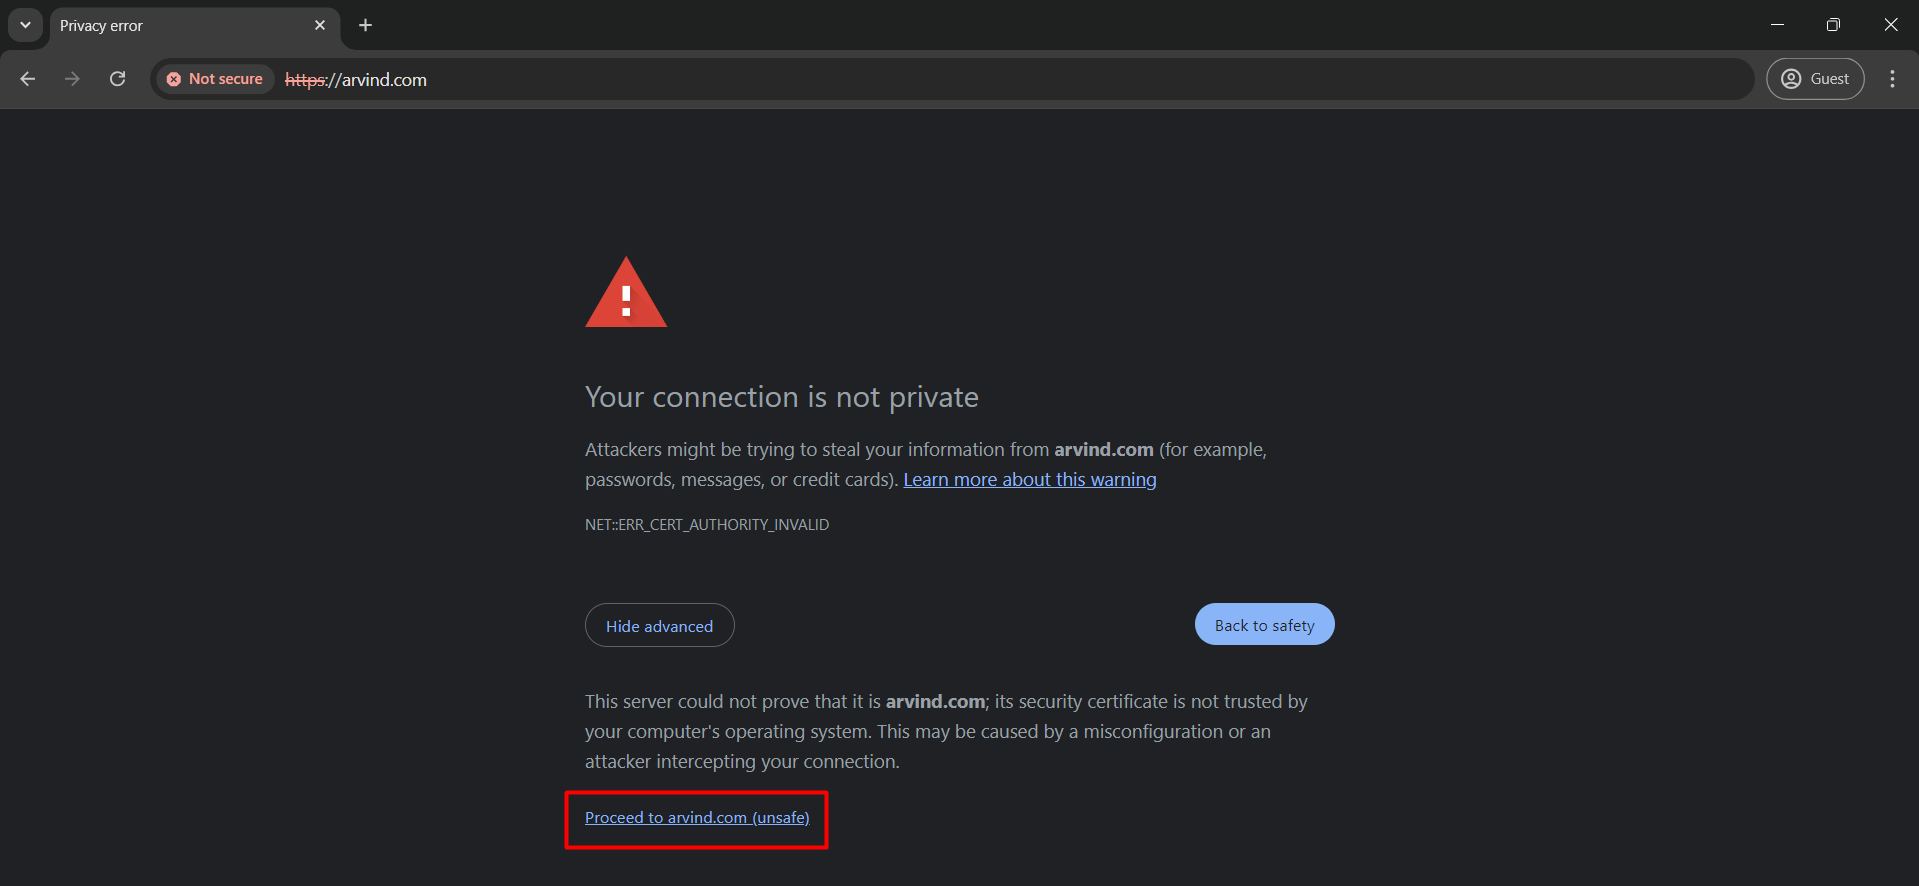
9. Proceed Manually
You can bypass the error by clicking on the Advanced button.
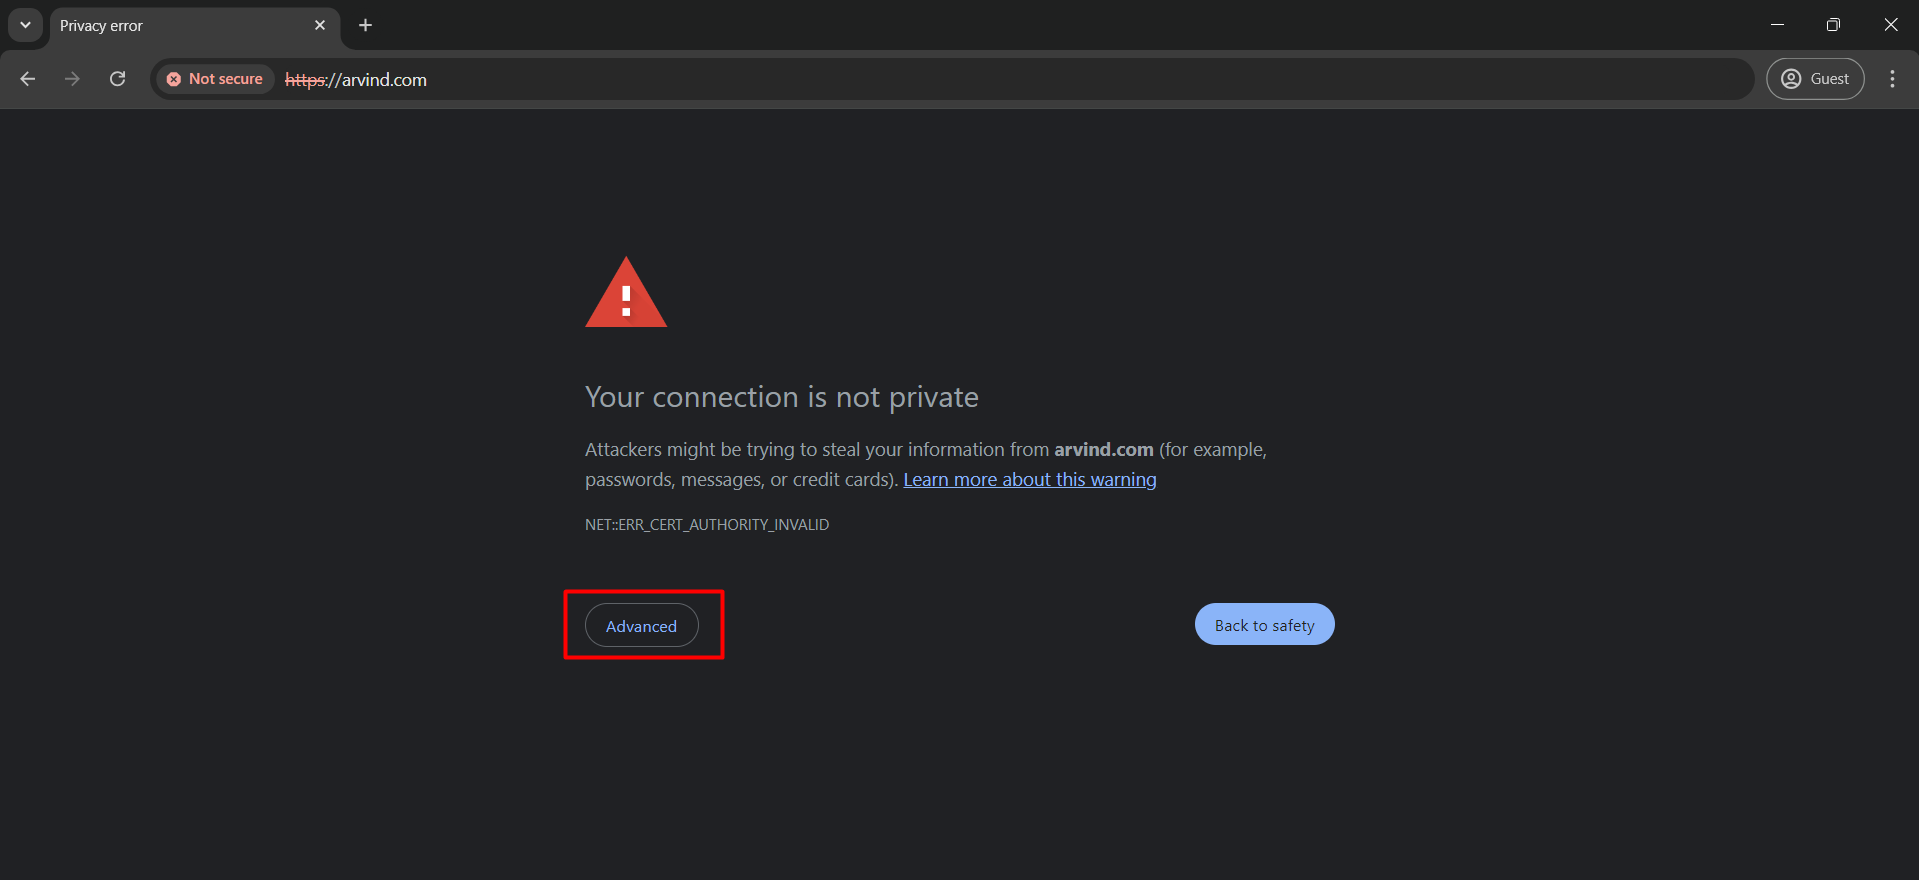
and selecting Proceed to website (unsafe).
10. Reset Your Network Settings
If none of the above solutions work, resetting your network settings can help.
Windows:
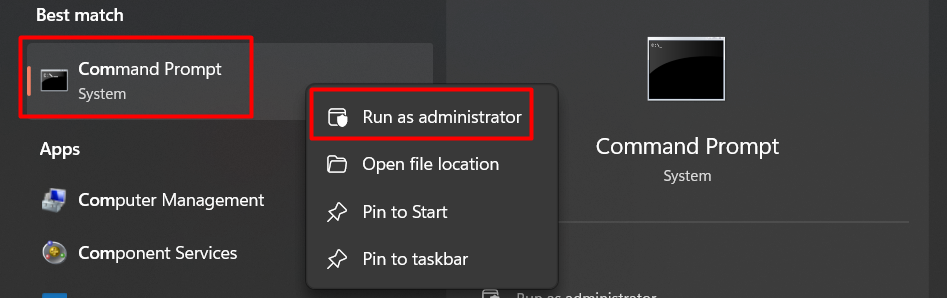
Step 1: Open Command Prompt as an administrator.
Step 2: Type the following commands one by one:
netsh int ip reset
netsh winsock reset
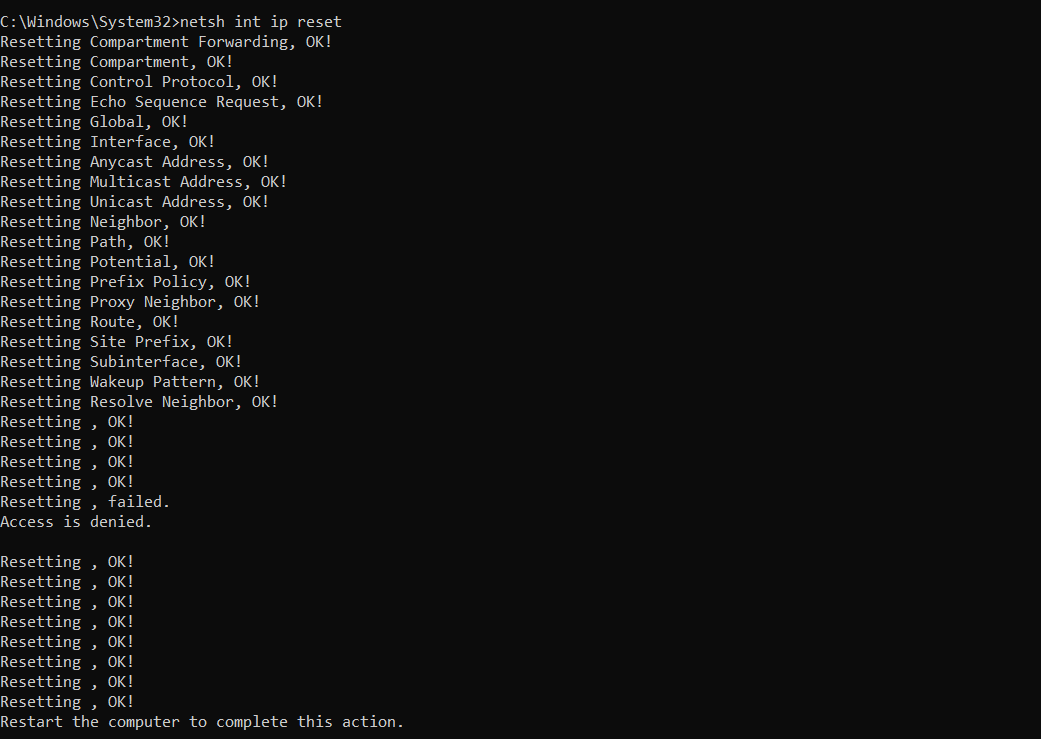
Step 3: Restart your computer.
macOS:
Step 1: Open System Preferences.
Step 2: Go to Network.
Step 3: Select your active network and click the minus (-) button to remove it.
Step 4: Click the plus (+) button to re-add the network and enter the required details again.
Fixing the “Your Connection Is Not Private” error ensures safe browsing and prevents repeated security warnings.
Common Website Errors:
1. Handle 404 ‘Not Found’ Errors
3. Failed to Load Resource 403 Error
4. HTTP 500 Internal Server Error
5. WordPress Login Page Refreshing and Redirecting
Conclusion:
The “Your Connection Is Not Private” is a warning message that the browser alert that prevents us from accessing unsafe websites. It is important to check and address this error to ensure our online safety. I hope this article will provide you will all the information you need to address the issue.
Please ensure that the browser and antivirus software on your system are always updated, as this will reduce the chances of getting affected by this error. If you have any other issues please contact our support we are always here to assist you.
Frequently Asked Questions:
Below are common questions related to the “Your Connection Is Not Private” error and its fixes.
1. Why does Chrome keep saying my connection is not private?
Chrome shows the “Your connection is not private” error when it cannot verify that the website you’re visiting is secure. This can happen due to several reasons, such as an expired SSL certificate, HTTP to HTTPS redirection issues, browser cache, outdated browser, incorrect system date and time, untrusted certificate authority, or malware.
2. How do I clear my connection is not private error?
To clear the “Your connection is not private” error, you can try the following steps:
- Reload the website.
- Clear the browser cache.
- Check and correct the system date and time.
- Update your browser.
- Run a full system scan for malware.
- If necessary, proceed manually by bypassing the error (not recommended unless the website is safe)
3. How do I fix my connection to private?
You can fix the connection to private by ensuring that the SSL certificate is correctly installed and not expired, setting up HTTPS redirection, clearing the browser cache, updating the browser, correcting the system date and time, and ensuring there is no malware on your system.
4. How to fix net :: err_cert_authority_invalid?
The net::err_cert_authority_invalid error occurs when the SSL certificate is provided by an untrusted certificate authority. To fix this, you should:
- Check and reinstall the SSL certificate if necessary.
- Ensure that the SSL certificate is from a trusted authority.
- Clear browser and network cache.
- Update your browser and operating system.
5. How to skip NET :: err_cert_authority_invalid?
To skip the NET::err_cert_authority_invalid error, you can manually bypass the warning by clicking on the “Advanced” button and then selecting “Proceed to [website] (unsafe).” However, this is not recommended unless you are certain the website is safe.
6. How to fix NET :: err_cert_authority_invalid on android?
On Android, you can fix this error by:
- Checking and correcting the system date and time.
- Clearing your browser’s cache.
- Updating your browser to the latest version.
- Switching to a different network to see if the issue persists.