
How to connect your Custom domain to Blogger (BlogSpot)?

By Arshath | August 6, 2023
As you are trying to figure out “How to connect your custom domain to blogger (BlogSpot)?“, let us start with our understanding of who is blogger.com and what they do so it will help you use their function properly and effectively.
Start with the Blogger:
Let’s say you have a domain and web hosting platform where you host that domain. But it cost you as it includes a lot of features to build content and a website. But you want a platform to create and host content for your domain and also a subdomain where you need not require that those additional features like the plugin, themes customize, URL specifications no need, and if ok with fewer SEO works, etc. That’s the main plot of blogger.com.
They are owned by Google and the one you will be hosting or creating a blog on their website will also be owned by google. You can point to blogger.com of your domain at any time without any web hosting plan for it. But we do not prefer or suggest it.
We can use the custom domain name/subdomain but compared to the subdomain (sub.yourdomainname.com) much better than the custom domain name when it comes to promoting your blog. Connect your domain to blogger and then it will look like yourdomainname.com or other TLDs.
ALSO READ: How to Start a Blog in India: Steps to create a Blog for free on WordPress with SEO and make money
Connect your Custom Domain to Blogger:
Let’s wrap up quickly with the steps you need to know to point to blogger.com.
Below are the guidelines to map your custom domain to your blogger
You can map your domain purchased from SeekaHost to your blogger account. Before you start, the following requirements are necessary to point a custom domain to a blogger,
1. Blogger account (Use your email id to create the blogger account).
2. New Domain name.
3. Access to domain management editor (Nameserver update) options for your domain.
Process 1: Login to Blogger account:
To set up or connect your custom domain to blogger, you will need to create/log in to your Blogger account. you can create one for free by going to the Blogger website and clicking on the “Create your blog” button.
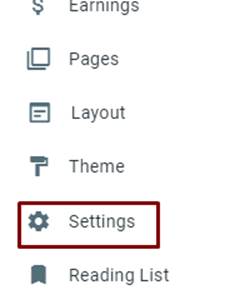
After logging in to Blogger, you will need to go to the settings,
Process 2: Add a custom domain:
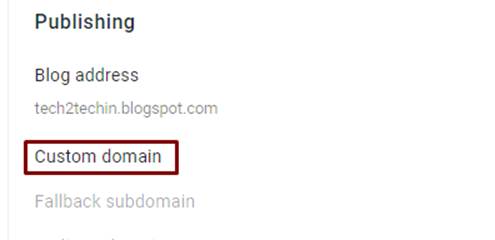
In the “Publishing” section, you will find an option to add a custom domain.
Now it pop-up the window to enter the custom domain name,
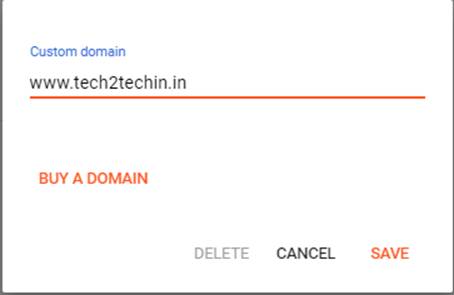
Note: You should enter the domain name with WWW to work.
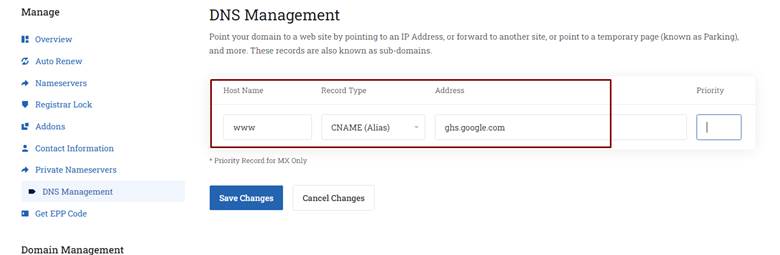
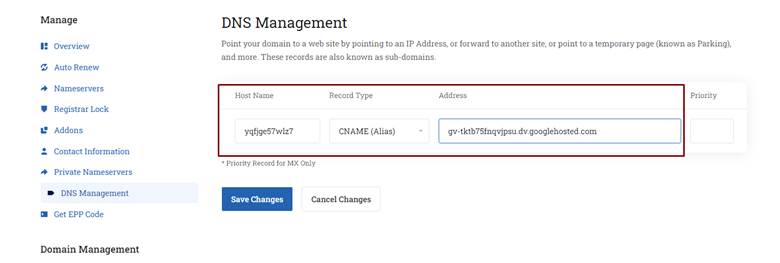
After that, You will get an error with a screen two CNAME records will appear.
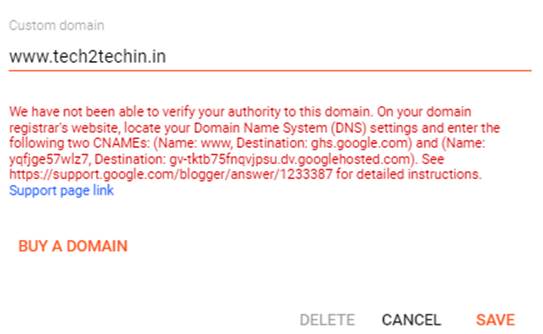
The first one is your blog CNAME (Name: www, Destination: ghs.google.com) and the second will be your Security CNAME.
You need to enter the above details in following format as hostname, Record Type, Address for both CNAME records.
NOTE: After adding both CNAME records, save the changes on your Blogger account and allow up to 24 hours for the DNS settings to fully propagate.
Process 3: Log in to the Client Area of SeekaHost:
Now that you have to connect your domain to blogger, you will need to login to the client area at SeekaHost.in.
To update or make any changes on the nameserver and to use the DNS Management of SeekaHost, Read here and then move on to next step.
Step 1: Login to client area -> click “domain section” and click the domain name where you want to make the changes for.
Step 2: Click Nameserver and use the custom nameserver as mentioned in the screenshot.

Nameservers:
- ns1.systemdns.com
- ns2.systemdns.com
- ns3.systemdns.com
Once updated, you can enable it again.
Step 4: Go to DNS management option and update the FIRST CNAME record.
Then update the SECOND CNAME record and click save to complete both the update.
After adding both CNAME records, save the changes to your Blogger account and allow up to 24 hours for the DNS settings to fully propagate.
Process 4: Add ‘A Records’ To Your Domain Name:
After updating CNAME details, to complete the configuration process, you should add the below given ‘A’ records to your main domain to use the custom domain on blogger.
A Records:
216.239.32.21
216.239.34.21
216.239.36.21
216.239.38.21
Leave the hostname field empty for A record update as the domain name will be taken directly.
Follow the below steps if you face any issues in HTTPS redirect on blogger.com:
1. Visit your blogger.com Dashboard.
2. Click “Settings” tab.
3. Check if HTTPS is enabled and disable the “HTTPS availability”.
4. Refresh the Setting tab after 5 to 10 minutes.
5. Now Enable the “HTTPS Availability” again.
6. Refresh the Settings tab once again after 60 minutes to help complete that changes.
7. Only if the status is “Available / OK”, enable the “HTTPS Redirection” option.
8. Clear the browser cache to avoid the previous cache of the website.