
How to Update DNS Records in SeekaHost India Client Area?

By Arshath | July 18, 2026
If you want to manage the domains or hosting DNS records for a domain, then you need a DNS Management Tool and perfect guidance on “How to Update DNS Records in Client Area?” to do by yourself.
This article will cover various common DNS records that you can Update DNS Records in the SeekaHost India Client Area for the domains registered with us at the cheapest cost.
Let’s Give a Notify sign before you go through the steps.
NOTE: Your Domain Name needs to have the DNS Management option enabled for the domains to perform the below actions.
General Points Regarding Manage DNS Records:
- Hostname field with an empty value means it takes the full domain name.
- No need to update “@” in the hostname filed.
- If you update DNS Records with any name in hostname field without a dot, it will take as subdomain of that record. Example, if you want to update “www.seekahost.in”, then you can just update “www” in the hostname field which will automatically propagate for “www.seekahost.in”.
What you Need to Update DNS Record:
1. Set the Nameserver to default nameservers of the domain as below,
ns1.systemdns.com
ns2.systemdns.com
ns3.systemdns.com
Remember, changes in the DNS Management will only propagate after completing this step.
2. A valid hostname value and address value of each record you update.
How to update DNS records at SeekaHost India:
To Update DNS Records of any type, please follow the below steps and proceed with the DNS record update of any record.
1. Log in to your SeekaHost India client area.
2. Click “Domains” section or box in the dashboard.
3. Now click the domain name for which you want to update DNS records for.
4. Navigate to the DNS Management option. If not enabled, please inform to us and we will enable it for you.
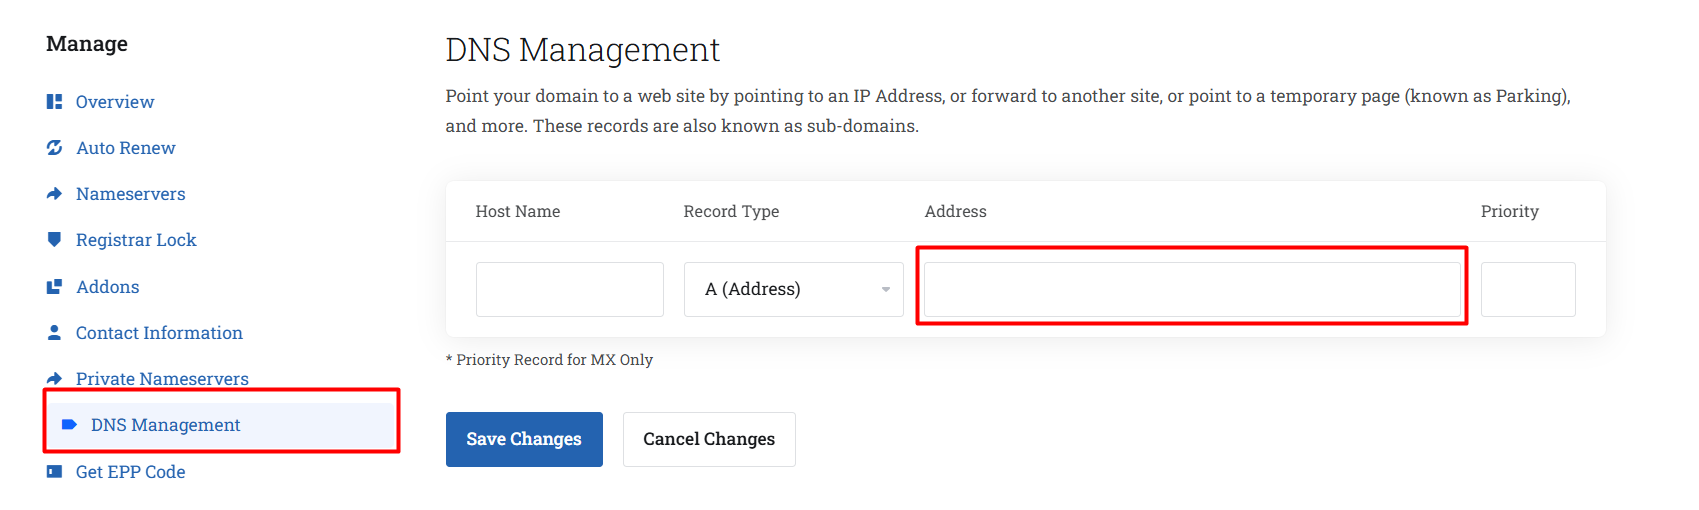
A (Address) Record
An A record maps a domain name to the IP address (IPv4) of the server hosting the domain. To update an A record in the SeekaHost client area:
1. Navigate to the DNS Management option.
2. Select ‘A (Address)’ as the Record Type.
3. Enter the IP address you want to point the domain in the Address Box.
4. After updating, click on “Save Changes”.
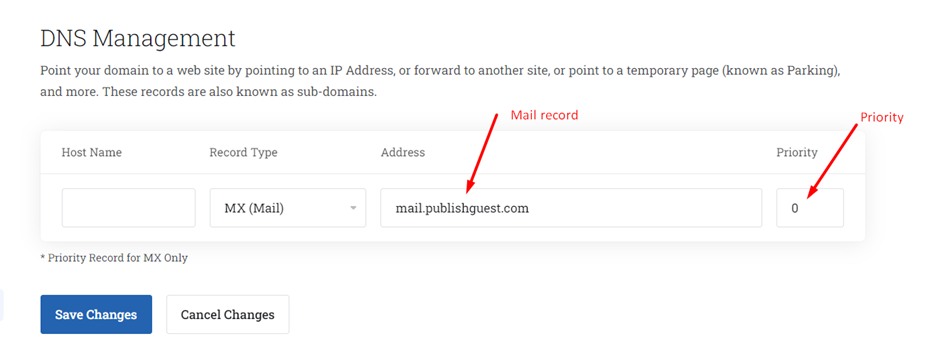
MX (Mail) Record
An MX (Mail Exchange) record specifies the mail servers responsible for receiving email on behalf of a domain. It consists of a hostname (e.g., mail.example.com) and a priority value that determines the order in which mail servers are contacted (lower values indicate higher priority).
Updating an MX Record:
1. Select the MX Records as the Record Type.
2. Add MX records by specifying:
- Hostname: Leave it as blank if it is domain name.
- Address: Mail Server/ MX Entries/ Address value of the record.
- Priority: Numerical value (e.g., 10, 20) indicating the order of priority.
3. After updating, click on “Save Changes”.
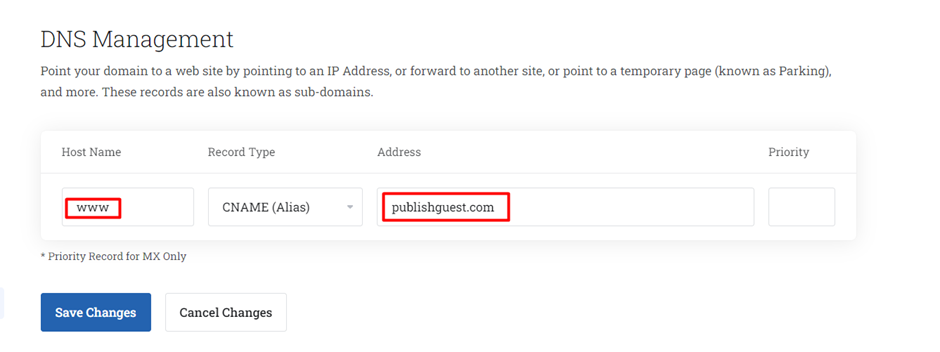
CNAME (Alias) Record:
A CNAME (Canonical Name) record is a type of DNS record used to alias one domain name to another. It allows a domain to have multiple names that point to the same location in the DNS hierarchy.
Updating a CNAME Record:
1. Select the CNAME Records as the Record Type.
2. Add or edit CNAME records by specifying:
- Host Name: The alias or subdomain name. (e.g., WWW)
- Address: The domain name to which the alias should point. (e.g., example.com).
3. After updating, click on “Save Changes”.
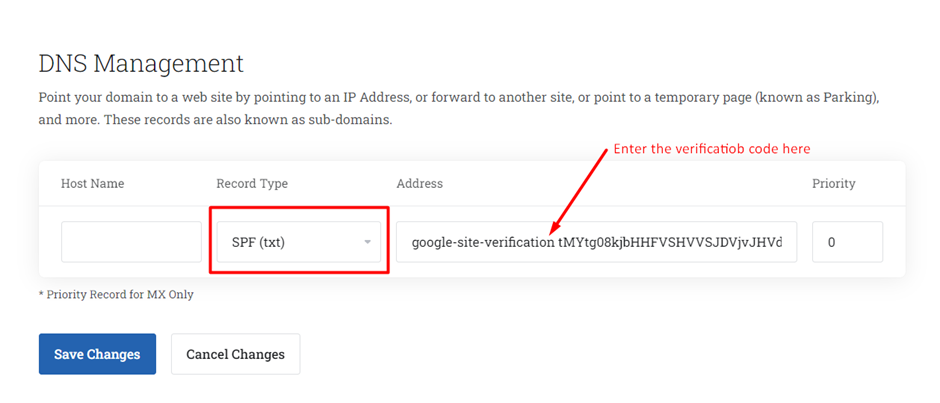
SPF (TXT) Record:
TXT records can hold arbitrary text data associated with a domain. They are often used for various purposes, including verifying domain ownership for services like Google Workspace or SPF (Sender Policy Framework) records used to validate email senders.
Updating an SPF Record:
1. Select the TXT Records as the Record Type.
2. Add or edit TXT records to include SPF information by specifying:
- Host Name: Leave it as blank if it is domain name.
- Value: SPF policy specifying authorized mail servers or any txt value.
3. After updating, click on “Save Changes”.
Additional Resource for More Knowledge:
1. What does DNS Translates a Domain Name Into?
2. Configure Cloudflare DNS for a Domain
3. Find your Domain Nameservers
Video Reference:
If you are a registered user in SeekaHost India and have any queries to be clarified or issues to be sorted, you can raise a ticket through the client area dashboard. For immediate interaction or guidelines, contact our support team available in Live Chat at the right bottom corner of the website.