How to Install and Run n8n with Docker Setup?

By Arshath | February 25, 2026
n8n workflow automation made everything simple and easy for task execution. Install and run n8n with Docker is the recommended method for self-hosting as it provides isolation, portability, and easier management of the application and its dependencies.
Let’s guide you with complete proper hosting guide using Docker for your n8n. Before that, let’s discuss what is n8n, docker and why we need to use docker for n8n.
What is n8n?
n8n is a free open source workflow automation tool that lets you connect multiple apps to automate their tasks using its visual builder without any coding knowledge. You can use simple drag and drop nodes to create workflows to sync data to execute data flow.
Why n8n?
Once you learn about n8n, the next question you might have is, “Why n8n?” Are there other workflow automation platforms available? Yes, there are alternatives, but when it comes to flexibility, complex workflow handling, customizing workflows, and competitive pricing, n8n has truly excels in these areas.
If you’re the person using slack, google sheets, and AI models then it will be the right choice for you in terms of automation, just drag and drop nodes that simplifies your workflow more flexible.
So, now we know what’s n8n and why its used in automation. Now we’re going to look for the docker.
What is Docker and Why It is Used?
Docker is an open source application which helps to manage an application, tool or software in containerized environment. You have doubt that you can able to run n8n with docker for multiple applications. Definitely yes, you can able to run multiple applications in a docker environment. Because it isolates each application or tool in a container with the necessary libraries for the app and tools within it.
Why Use Docker?
Docker assures you the applications or software’s run in same way as in development, staging and production use mainly of it structure, every code, system tools, libraries are isolated or structured inside the containers, so there is no conflicts with other applications. Also the isolation helps the security as we already know that the containers is isolated. So there is no more crashes on host systems, and optimized resource efficiency helps you with the performance as well as cost saving as you can run n8n with docker for multiple apps. (If you run multiple application your Server need to support its performance)
How to Run n8n with Docker?
Start with purchasing a self hosted n8n VPS Hosting for your n8n environment with best requirements for setup. You can run n8n with docker by using the simple command “docker run” or most common and safest way by using the docker-compose which is also the best way to use in production environment. To run n8n with docker, you need to install the docker on your server from the dockers official installation directory and make sure to install the latest version.
Step 1: Install Docker
Install the Docker and confirm if running with the below command
$ docker --versionThis should print your Docker version.
Step 2: Create n8n Directory
Create a n8n directory on your server and navigate to the directory using the command below
$ mkdir test-n8n

$ cd test-n8n
Step 3: Create a Docker Compose File
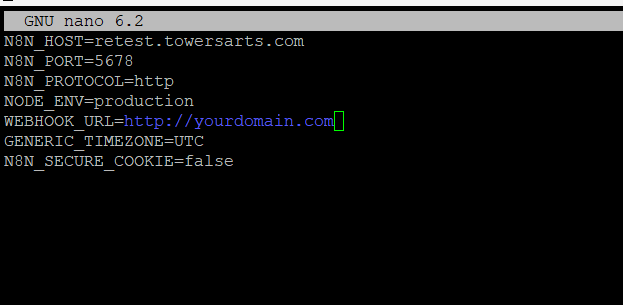
After navigating to the directory, first create a .env file (nano .env) separately to avoid variable conflicts.
It’s one of the best method to use environment variables and then create a docker-compose file with the below content using the text editor (nano docker-compose.yml). Here I used nano editor but you can use other text editors whichever you’re comfortable with.
File Content:
version: "3"

services:
  n8n:
    image: n8nio/n8n:latest
    restart: always
    ports:
      - "5678:5678"
    env_file:
      - .env
    volumes:
      - n8n_data:/home/node/.n8n

volumes:
  n8n_data:
What this file does:
- image: Uses the official n8n Docker image.
- ports: Exposes n8n on port
5678. - environment: Sets up basic authentication so only you can log in.
- volumes: Persists your n8n workflows locally so they don’t get lost when containers restart.
Save the file and exit the editor. (ctrl + O)
Step 4: Start Container
Now you have setup the n8n inside the docker and now you need to start the container by using the command below
$ docker compose up -d
To Confirm if container is running, run the below command.
$ docker ps
You will see all running containers and their ID or names check for n8n and you will see a status as running.

Step 5: Access n8n Dashboard
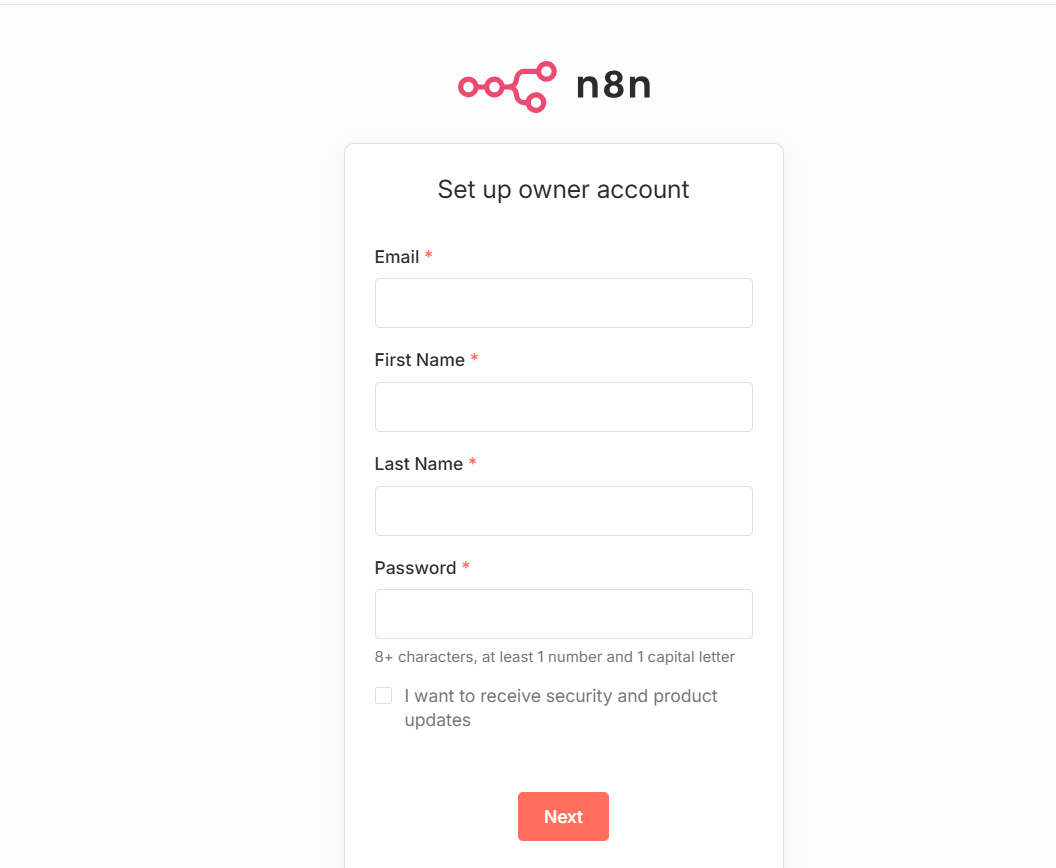
Now your n8n is installed and run n8n with docker, you can now access your n8n using the hostname or domain or http://localhost:5678, whichever you used to configure the n8n. You can see a n8n owner account registration, where you can set the preferred credentials for your n8n, which later used to login for the n8n workflow account.
Once you logged into the n8n dashboard, you can start creating the workflows as you like. You can either start from scratch or using n8n predefined templates, which you can use it on your workflow.
Working with Environment Variables:
You may need to use environment variables to connect databases, or connecting your automation with the third parties.
To do this you need to login to your server using SSH and navigate to the n8n directory, and run the following command to add or edit the environmental variable
$ nano docker-compose.yml
You need to edit the docker-compose and your. env files to make changes to your n8n.
LEARN: n8n Best Practices For Successful Automation
Conclusion
At SeekaHost India we provide the best hosting service which tailored for the user friendliness of the clients. Our n8n Self hosting environment gives the power to automate the workflow more flexible and efficiently Just navigate to SeekaHost India’s client area portal, choose n8n Self Hosted package proceed with the check out within a minute or two you can start creating the Workflow.