











How to Install Free SSL Certificate in cPanel – SeekaHost India

By Gowdham | August 6, 2026










Is SSL important? Whether all websites need SSL?
Let’s get into the topic!
SSL(Secure Sockets Layer) is used for a secured channel between the server and the client. While we search for something in google we found that it is secured connection or not. If it is displayed in HTTP it is an unsecured connection or it displays HTTPS then it is a secured connection. SSL is one of the SEO factor. Also, for business sites it builds the trust for the customers.
If SSL certificate is installed, the encrypted data is seen only by source and destination nobody will able to decrypt your data while transaction.
For the secured connection we need to install the SSL certificate.
Video Reference:
How to Install Auto SSL in cPanel?
Step 1: Login to the cPanel Account.
Step 2: Under Security section, click SSL/TLS Certificates option.

Step 3: Click “Wizard” tab.

Step 4: Select the checkbox for the main domain to include all subdomains if pointed already. Click the Continue button.

Step 5: Now click Let’s Encrypt Certificate button.

Step 6: Now in the popup window, click checkbox to accept the terms of Let’s Encrypt. Click Continue button.

Step 7: Now the SSL certificate will be installed in the cPanel for the website.

Step 8: SSL for the subdomain will be automatically covered once the server cron runs, as long as the main domain has SSL installed.

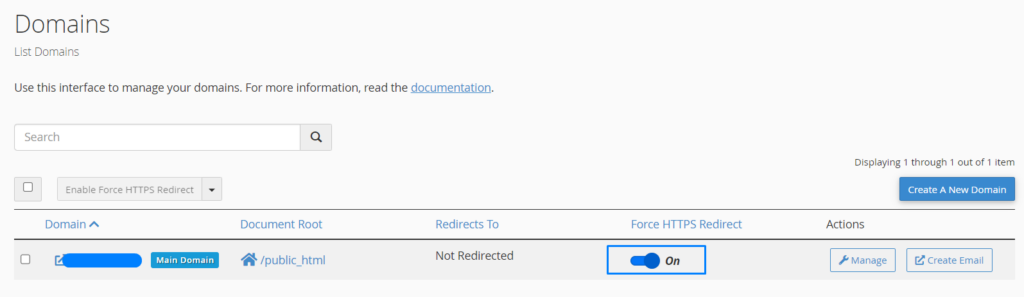
Step 9: Enable Force Redirect in the Domains section to automatically redirect HTTP visitors to HTTPS.
Step 10: If you want to uninstall the SSL certificate, go to Installation tab

Now click “Uninstall” option near the installed certification.

Things to Consider for SSL Insecure Error:
1. Wait for DNS Propagation:
- If you recently updated your domain’s A record or nameservers, wait up to 24–48 hours for DNS propagation before installing or reissuing SSL.
- SeekaHost: If your domain uses SeekaHost nameservers, SSL will be installed automatically within 12 hours after the nameserver update.
2. Check Disk Usage:
- If your hosting account has exceeded its disk space limit, free up space by deleting unnecessary files, then try installing SSL again.
3. Check File Usage (Inodes)
- If your inode (file count) limit has been reached, delete unnecessary files to reduce the count, then reinstall SSL.
- If your hosting panel doesn’t show inode usage, contact your hosting provider for assistance.
4. Verify Cloudflare SSL Settings
- If your domain is using Cloudflare and you’re seeing an SSL mismatch or “Not Secure” error, make sure your Cloudflare SSL/TLS settings match your hosting server’s SSL configuration.
- Follow our step-by-step guide on How to Update DNS Records in Cloudflare to configure your SSL/TLS settings properly.
In case you’re looking for OV, DV, EV Cerificates you can purchase SSL Certifcates and configure with your website.