
logo
Login
  • Home
  • Services
    • Close
    • Hosting
      • Web HostingWeb Hosting
        Hosting designed for consistent performance and stability
      • Plesk HostingPlesk Hosting
        Easy-to-manage hosting with Plesk control panel included.
    • CMS Hosting
      • wordpress hostingWordPress Hosting
        Optimized WordPress hosting with speed & security
      • ecommerce hostingWooCommerce Hosting
        eCommerce hosting for growing online stores
    • Servers
      • VPSVPS Hosting
        Virtual servers with dedicated resources and flexible configs
      • Dedicated ServerDedicated Hosting
        Complete control with your own physical dedicated server
    • Domains
      • Business HostingRegister a Domain
        Secure your domain name for your online presence
      • transfer your domainTransfer Domains
        Move your existing domain to our reliable registrar service
    • Domain Tools
      • Business Name GeneratorName Generator
        Create unique, catchy names for your brand
    • Security
      • SSLSSL Certificates
        Secure your site and boost trust with SSL encryption
    • Communication
      • Email HostingEmail Hosting
        Secure, professional email for your business needs
    • Launch
      • host n8n iconn8n Self HostedNew
        Full automation control with your own self-hosted n8n.
  • Quick Access
    • Close
    • .COM domain
    • .IN domain
    • Domain Pricing
    • Adaptive Core Security Suite
  • Resources
    • Close
    • Blog
    • Customer Reviews
site logo
  • Home
  • Domain
    • WordPress Hosting

      Register Domain Name

      Reseller Hosting India

      Business Name Generator

      Domain Checker

      Domain Checker

      SSl certificates

      SSl certificates

      Transfer domains

      Transfer domains

      Domain Pricing

      Domain Pricing

  • Hosting
    • LiteSpeed Hosting

      Cheap Web Hosting

      Reseller Hosting India

      Business Hosting

      WordPress Hosting

      WordPress Hosting

      Email Hosting

      Email Hosting

      VPS Hosting

      VPS Hosting

      Dedicated Server

      Dedicated Server

  • Client area
  • Contact Us

Knowledge from SeekaHosters

How To Start A Blog Earn Money Online Digital Marketing Tips Website Hosting Tips Website SEO
Create and Manage Email account in Plesk

How to Create and Manage Email Account in Plesk

How to Create and Manage Email Account in Plesk

By Karthi | August 13, 2026

Simplify Article With:
Share Article With: Link copied

Create email account in Plesk is a simple process that helps you establish a professional email address using your domain name. Whether you’re setting up a new mailbox for yourself or your team, Plesk provides an intuitive interface to create, manage, and update email accounts with ease.

In this guide, you’ll learn how to create and manage email accounts in Plesk, including setting up new mailboxes, configuring essential email settings, and modifying account details to keep your business communication secure and organized.


Steps to Create Email Account in Plesk:

Step 1: Log in to Plesk

Step 2: From the left-hand navigation menu, click Mail.
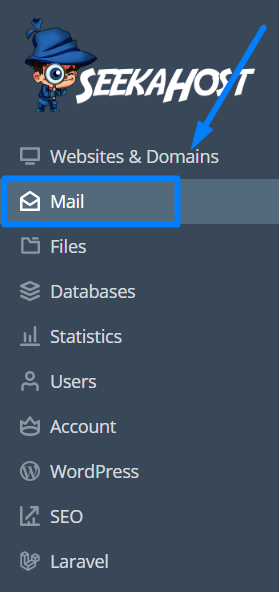
Mail Account - Plesk


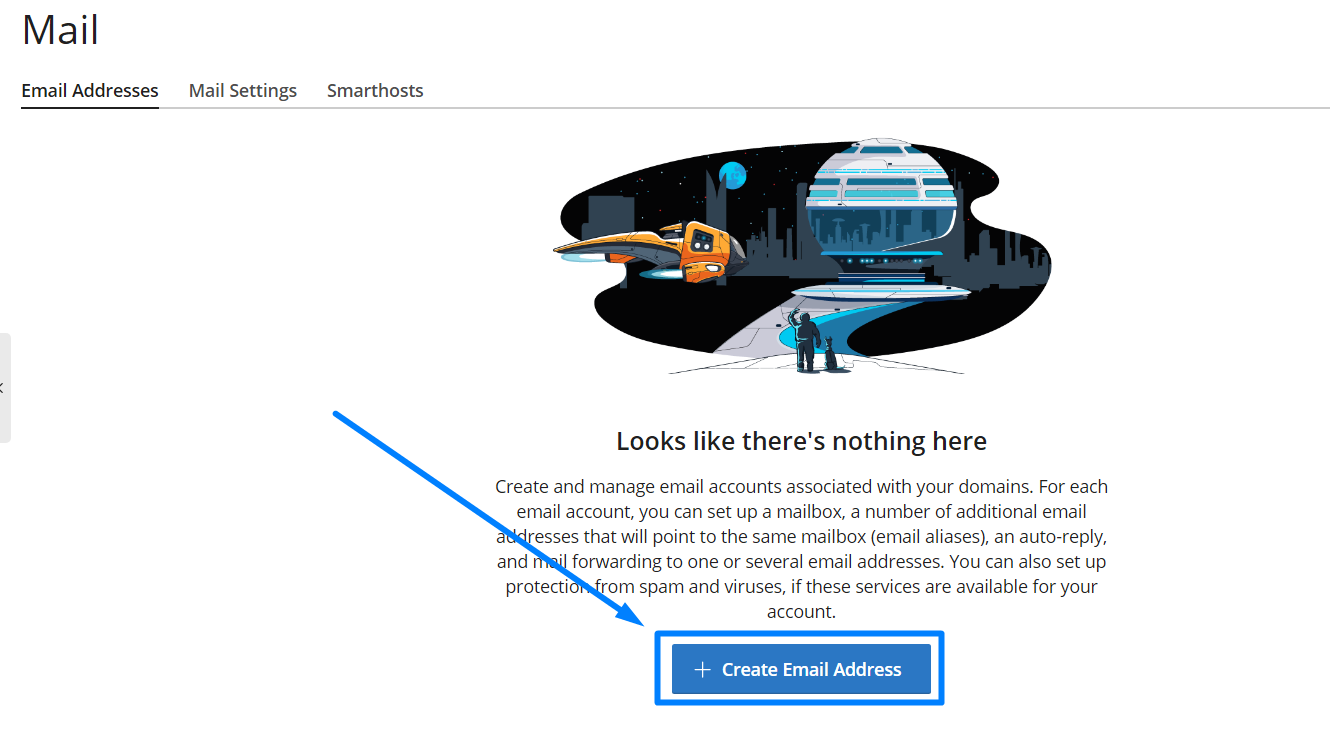
Step 3: Click Create Email Address.

Create Email Address


Step 4: Enter the required mailbox details

Email Address – Enter the user name

Password – Use Generate button to create password. You can click show button to display the password.

Mailbox – Set or change default mailbox size
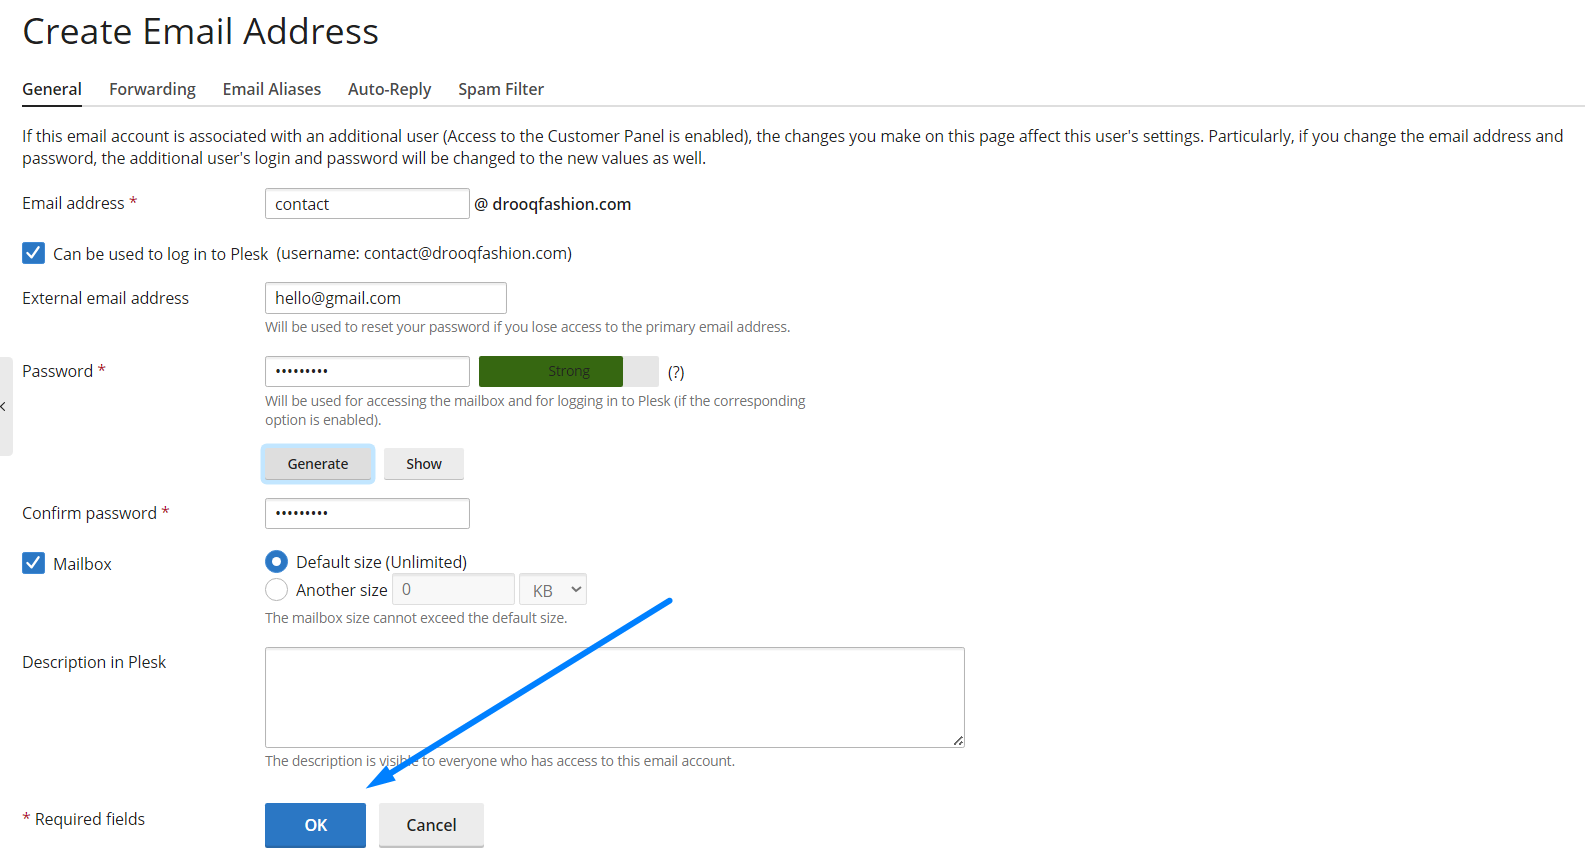
create email account in plesk


Step 5: Once done, click OK button to successfully create the email account.


How to Manage Email Accounts

Step 1: Select Mail from the left menu.

Step 2: Click on the email address you want to configure.
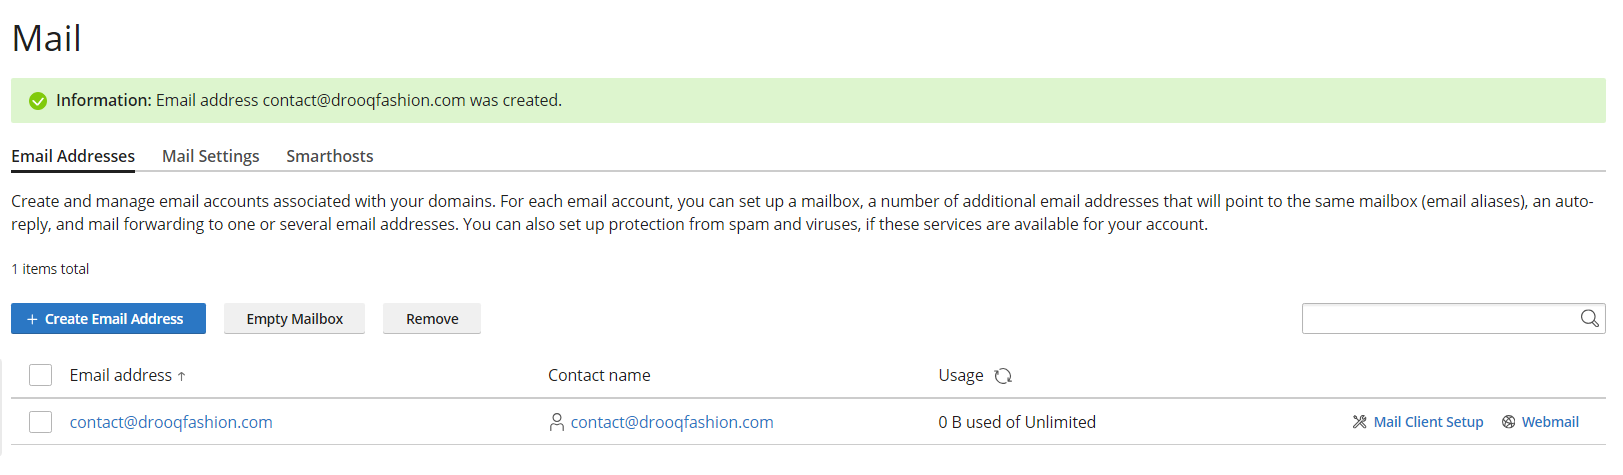
Email Account Manage - Plesk


Step 3: Here you can easily update the settings for Forwarding, Email Aliases, Auto reply and spam filter.
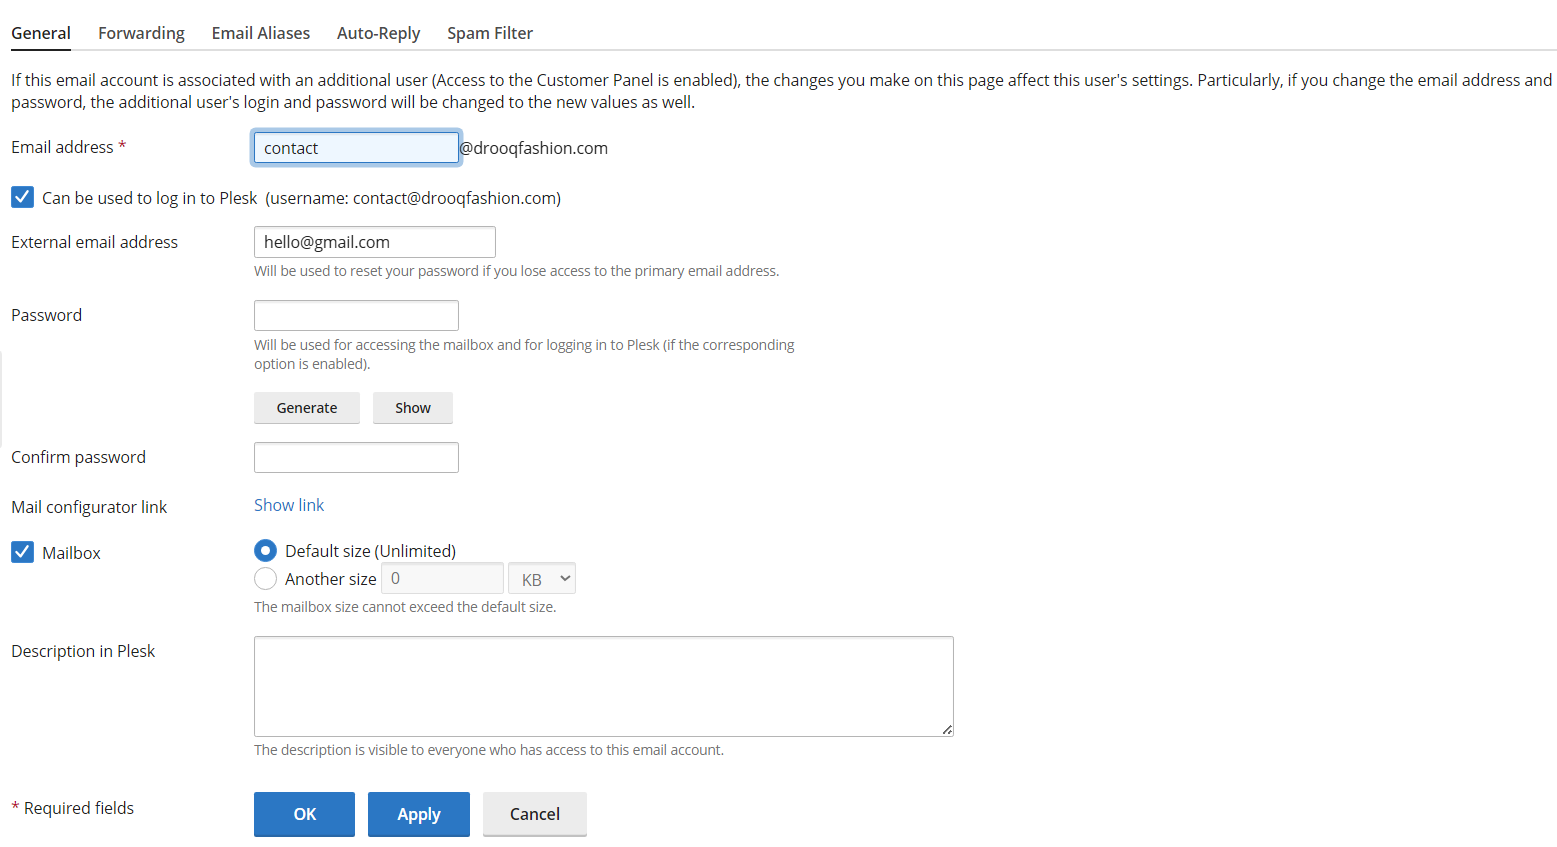
General Settings for Email - Plesk


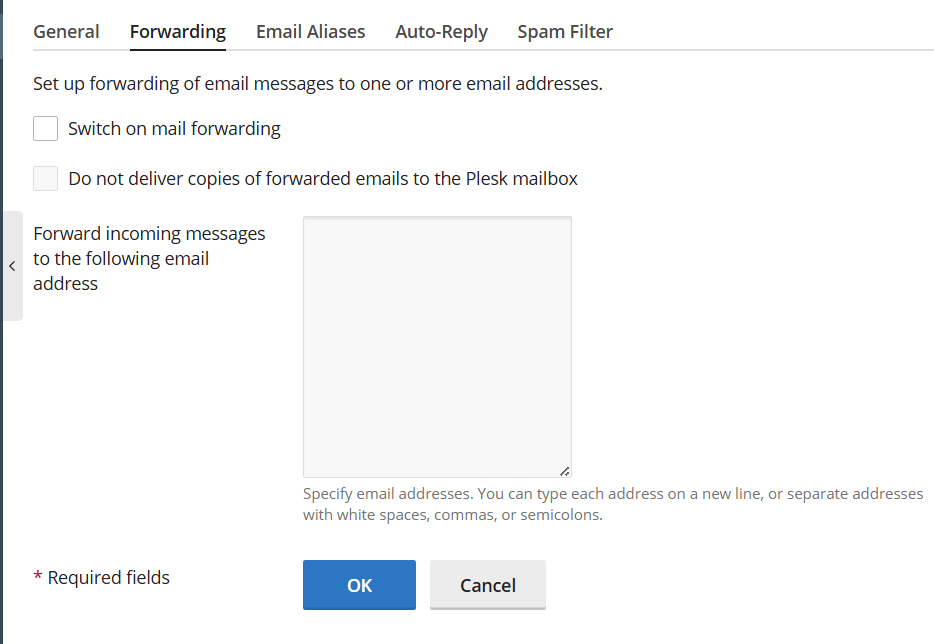
Forwarding:

Forwarding Email - Plesk


Enable Forwarding: click “Switch on mail forwarding” to activate it.

Keep Plesk copies: Leave the second box unchecked to keep backups in Plesk.

Delete Plesk copies: Select “Do not deliver copies” to keep emails only at the destination.

Forward incoming messages: Enter the destination email addresses in the text box.


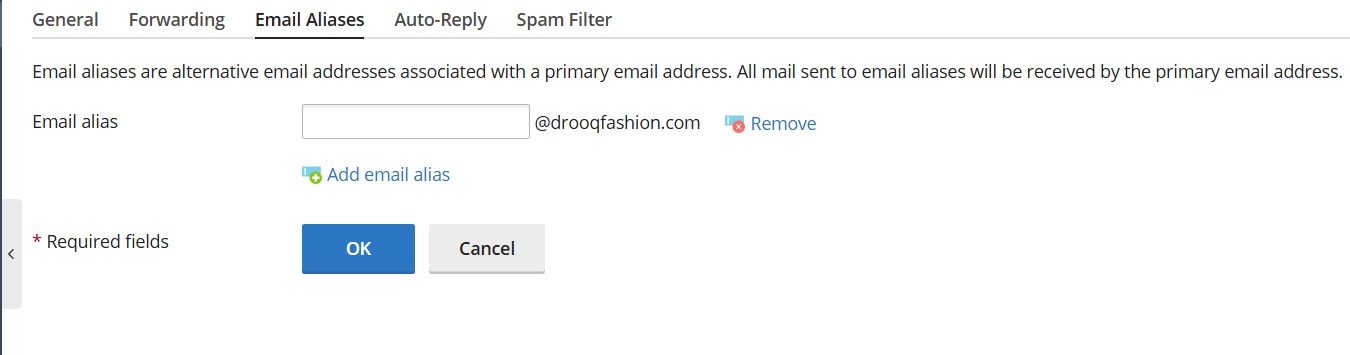
Email Aliases:

Email Aliases - plesk


Email alias: Enter the alternative name for your primary email address in the text box.

Add email alias: Click this link to create additional alternative email names if needed.

Remove: Click this option next to any alias to remove it from your account.

Save changes: Click OK to apply your new alias settings.


Auto-Reply:
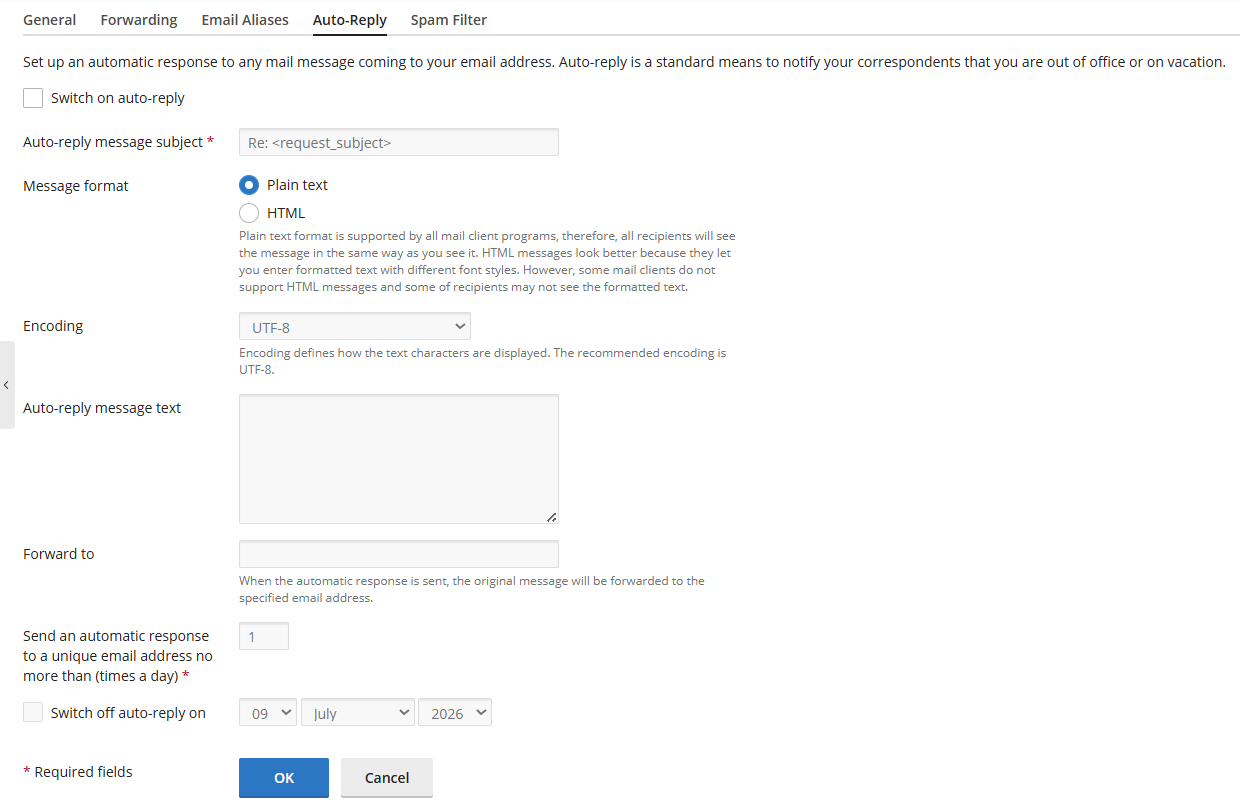
Auto-reply - Plesk


Switch on auto-reply: Select this box to enable automatic email responses.

Auto-reply message subject: Enter the subject line for your automated reply email.

Message format: Select either Plain text or HTML for the message styling.

Encoding: Select the character encoding type from the drop-down menu.

Auto-reply message text: Type your primary automatic response message in this text box.

Forward to: Enter an email address to forward original messages while auto-replying

Send an automatic response: Set the maximum number of daily replies per unique address.

Switch off auto-reply on: Check this box and choose a date to automatically disable replies.

Save changes: Click OK to apply your new auto-reply settings.


Spam Filter:
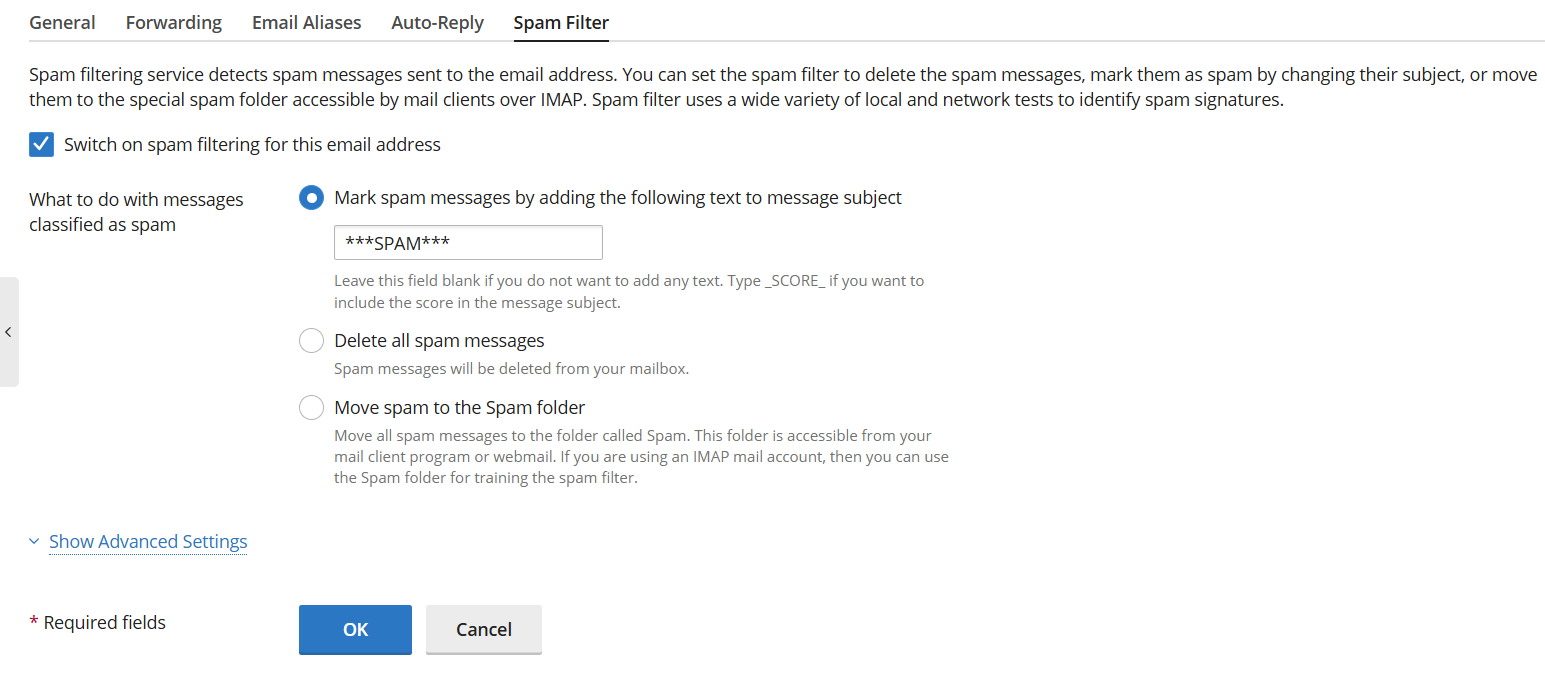
Spam Filter - Plesk


Switch on spam filtering: Select this box to enable the spam detection service.

Mark spam messages: Select this to add custom text, like SPAM, to subjects.

Delete all spam messages: Select this to automatically erase junk emails right away.

Move spam to the Spam folder: Select this option to store junk messages in a separate folder.

Show Advanced Settings: Click this link to open more advanced filter customization options.

Save changes: Click OK to apply your new filter settings.


Step 4: Click OK or Apply to save the changes.


Best Practices After You Create Email Account in Plesk

To keep your email account secure and reliable:

  • Use a strong, unique password.
  • Update passwords regularly.
  • Enable spam filtering to reduce unwanted emails.
  • Monitor mailbox storage to prevent it from reaching its limit.
  • Remove unused email accounts when they are no longer needed.
  • Configure email forwarding only when necessary.


Troubleshooting:

If you cannot create email account in Plesk, check the following:

  • Verify that your domain has email services enabled.
  • Ensure your hosting plan includes email functionality.
  • Confirm that mailbox storage limits have not been exceeded.
  • Check that the email address is not already in use.
  • Contact your hosting provider if mail services are disabled on the server.


Relevant Articles:

1. Upload Files in Plesk File Manager

2. Create and Restore Backup in Plesk

Video Reference:


Once you create email account in Plesk, managing your business email becomes simple and convenient. From creating new mailboxes to updating passwords, configuring forwarding, and enabling spam protection, Plesk provides all the tools needed to keep your email accounts secure and organized.

Setting up and managing your email in Plesk is a straightforward process that takes only a few minutes. Now that your mailboxes are configured, you are ready to send secure, professional emails under your own domain name.

Contact our live chat support if you need any assistance during the setup process.

Buy cheap .IN Domain

Recent Posts

  • How to Change PHP Version and PHP Settings in Plesk
  • How to Create and Manage Email Account in Plesk
  • How to Install Git Command Line: Windows, macOS, and Linux
  • How to Set up Domain Email on Different Outlook Versions
  • 5 Simple Steps to Change PHP version in cPanel
  • Connect with us

Main Packages

  • Web Hosting
  • Email Hosting
  • Business Hosting
  • VPS Hosting
  • Dedicated Servers
  • SSL Certificates

Information

  • Branding
  • Payment Methods
  • Customer Reviews ⭐
  • Information Blog

Domain Name Services

  • Buy a Domain
  • Transfer a Domain
  • Domain Pricing

Domain Tools

  • Domain Name Checker
  • Business Name Generator

CMS Hosting Package

  • Managed WP Hosting
  • Magento Hosting
  • WooCommerce Hosting

Control Panel Package

  • cPanel Hosting
  • LiteSpeed Hosting
  • Plesk Hosting
  • Reseller Hosting

Guides & Resources

  • Migrate to Us
  • How To Start A Blog
  • Earn Money Online
  • What is a Top Level Domain
  • How to Register Domain
  • VPS Hosting Guide

Account

  • Sign-In to Your Account
  • Customer Care
  • Knowledgebase
  • Announcements
  • Partner Program
  • Service Status

Legal

  • Terms and Conditions
  • Refund Policy
  • Privacy Policy
  • Report Abuse
logo
  • SeekaHost India Web Services Private Limited

  • Copyright © 2026 | All Rights Reserved.

Top 10 most rated web hosting company in India cPanel Certified Partner
Manage Consent
To provide the best experiences, we use technologies like cookies to store and/or access device information. Consenting to these technologies will allow us to process data such as browsing behavior or unique IDs on this site. Not consenting or withdrawing consent, may adversely affect certain features and functions.
Functional Always active
The technical storage or access is strictly necessary for the legitimate purpose of enabling the use of a specific service explicitly requested by the subscriber or user, or for the sole purpose of carrying out the transmission of a communication over an electronic communications network.
Preferences
The technical storage or access is necessary for the legitimate purpose of storing preferences that are not requested by the subscriber or user.
Statistics
The technical storage or access that is used exclusively for statistical purposes. The technical storage or access that is used exclusively for anonymous statistical purposes. Without a subpoena, voluntary compliance on the part of your Internet Service Provider, or additional records from a third party, information stored or retrieved for this purpose alone cannot usually be used to identify you.
Marketing
The technical storage or access is required to create user profiles to send advertising, or to track the user on a website or across several websites for similar marketing purposes.
  • Manage options
  • Manage services
  • Manage {vendor_count} vendors
  • Read more about these purposes
View preferences
  • {title}
  • {title}
  • {title}