

8 Simple Steps to Install SSL certificate on Windows Server

By Kathir | August 4, 2026
Installing an SSL certificate is essential to secure your website, build user trust, and improve SEO rankings. In this guide on how to Install SSL certificate on a Windows Server, you will learn step-by-step methods using both Let’s Encrypt (free SSL) and paid SSL options.
This tutorial will help you easily configure SSL through IIS and secure your domain without confusion.
Why Install SSL Certificate?
Before going in to the Install SSL certificate, you need to know why the SSL is important for your site, why you would need a paid SSL for your business Site. As you know the SSL certificates helps your site to load in encrypted way to built trust among users via pad lock icon on your sites and also helps in improving the SEO of your site on search engines, prevents search engines or browsers in marking your sites as “not secure”
Let’s Encrypt vs Paid SSL
Let’s Encrypt is a free SSL for a domain that provides the secured encryption for the domains as the same level as paid SSL certificates which makes it as a most common choice to use on all types of websites. Whereas, the paid SSL is trusted and a reliable SSL for your site which commonly used by organizations, large enterprises, business persons for their sites which offers high level validation and encryption for your domains.
Install SSL certificate on Windows
As like any other hosting environment, Install SSL certificate on Windows may feel complex as it requires IIS (Internet Information Services) and other process like manually configuration of SSL files and mandatory of private key. It also requires a manual binding of the site or domain to use SSL which may cause error if anything goes wrong.
No worries. We’ll guide you on how to install SSL certificate for the site or domain runs in a windows server in a step by step process.
2 Different Ways to Install SSL Certificate on Windows Server:
1. Using Let’s encrypt SSL
2. Paid SSL Certificate
1. Using Let’s encrypt SSL:
Installing the Lets encrypt SSL on the Windows server requires an additional tool “Win-acme“, once you installed the win-acme from the official website, follow the below steps to install the Lets Encrypt SSL:
Step 1: Choose the Certificate type
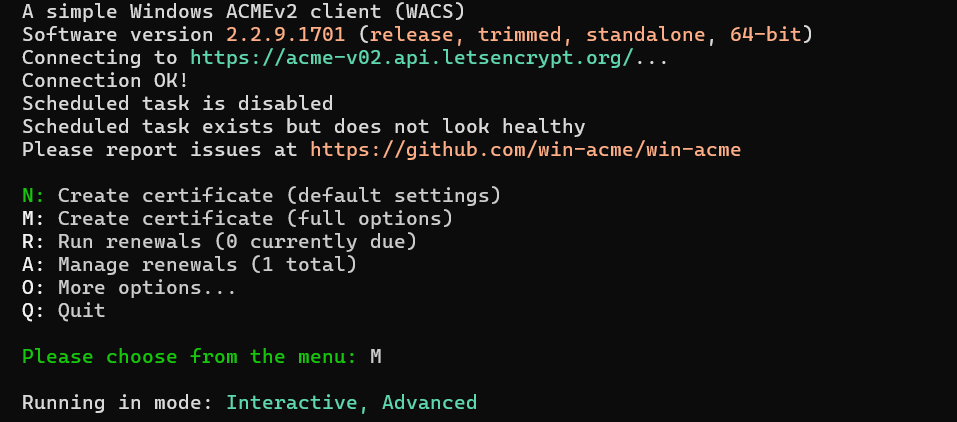
Open the CMD as Administrator and run the following command “wacs.exe” by navigating to the win-acme directory. From the available options, select the option “M” to create a certificate.
Step 2: IIS Binding
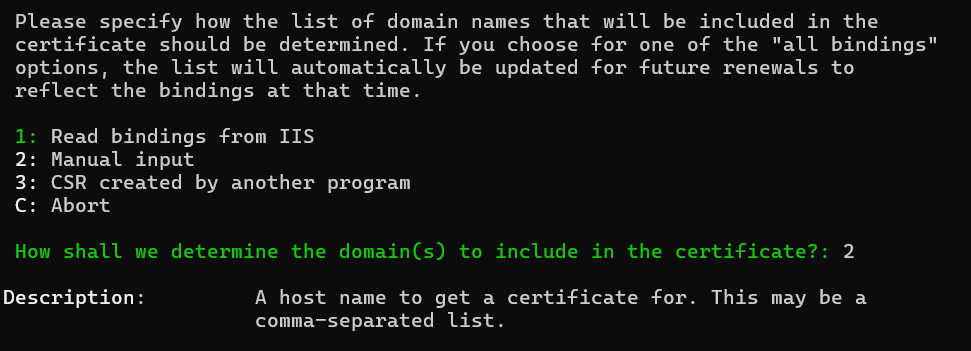
Choose the binding type as option “2” – manual binding and enter. It will ask for the “Host Name“, type your domain name when prompted
Step 3: Choosing the SSL type
Choose the SSL type -> select the single certificate – option “4” (you can select your SSL type, here I selected single certificate to use on single domain)
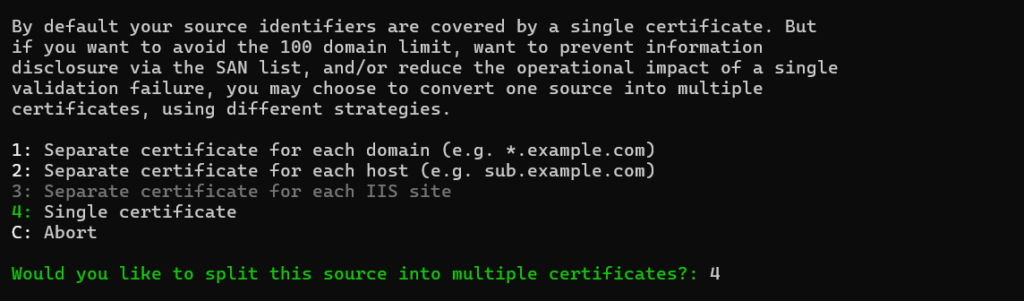
Step 4: Verification Type
Choose the Verification type “[http] Serve verification files from memory” in the option “2” to complete the verification within the Windows server without any additional steps.
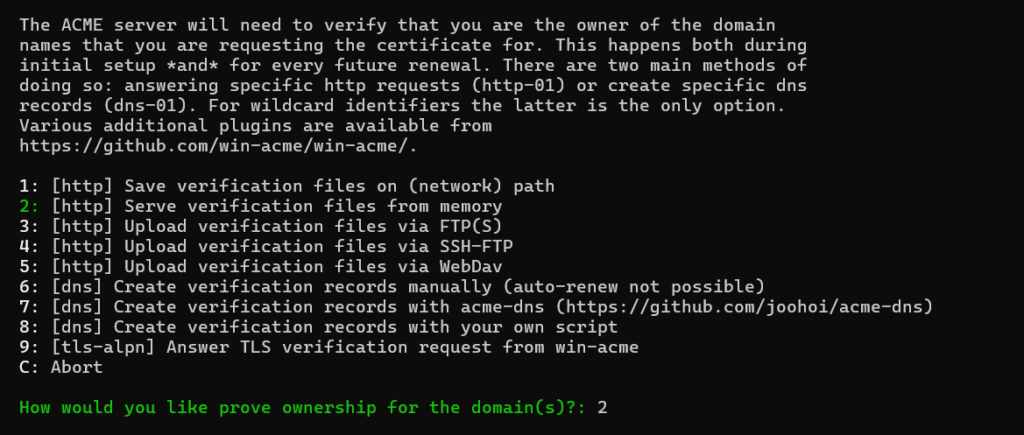
Step 5: Ownership Verification
Verify the domain ownership by selecting the RSA Method on option “2”
Step 6: Private Key Verification
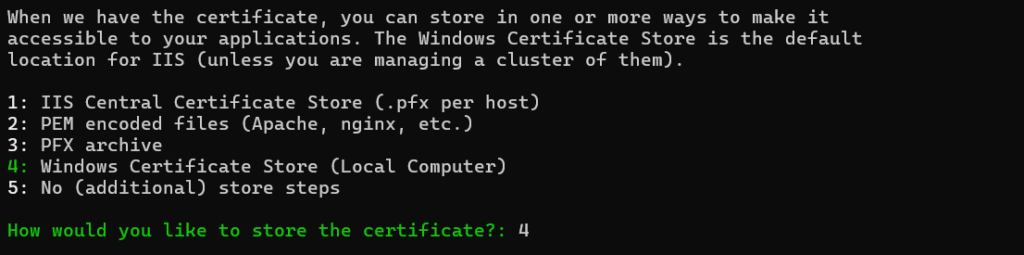
On the private key verification option choose the Windows Certificate Store (Local Computer)
Step 7: Choosing the certificate Store
Choose the certificate store as “Web Hosting” or Select “Default” for storing the certificate.
Step 8: Update the binding
Once done, skip the next step by choosing the option “5”. After skipping, choose the “create or update binding in the IIS”
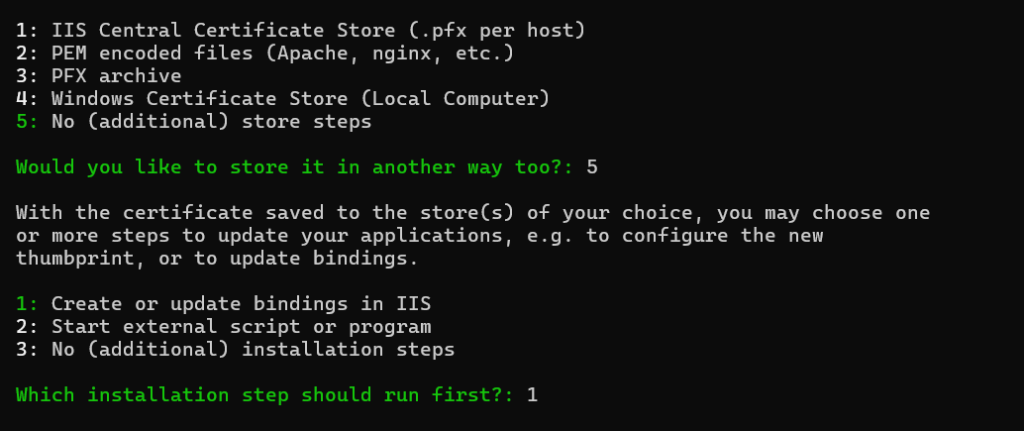
Step 9: Choosing the Domain
After selecting the binding update, choose the domain from available domains (Domains shown here was the site listed in bindings under the IIS) which you would like to Install SSL certificate.
Win-acme will automatically bind your site in IIS to SSL. Once the installation is completed, you can check the site loading with SSL on browser.
2. Paid SSL Certificate
Step 1: Placing the Order for SSL Certificate
You can directly buy an SSL certificate from SeekaHost India or login to client area and go to the Services section. Click on “SSL Certificates” to check the SSL products available.
From that, select GoGetSSL Secure Domain SSL for your domain. During checkout, enter the domain name you want to secure and complete the purchase.
Step 2: Generating the necessary certificates
After purchasing your SSL certificate, you need to generate the required files to configure it on your Windows Server.
Go to the SeekaHost India client area dashboard, then navigate to Services -> SSL. Select the SSL certificate you recently purchased for your domain and click on “Configure Now.”
Step 3: Generating the CSR
Once you open the Configure Now page, choose New Order as order type (Fresh Installation).
After selecting the order type, you need to generate a CSR (Certificate Signing Request). Click on “Generate CSR” to proceed and create the required details for your SSL setup.
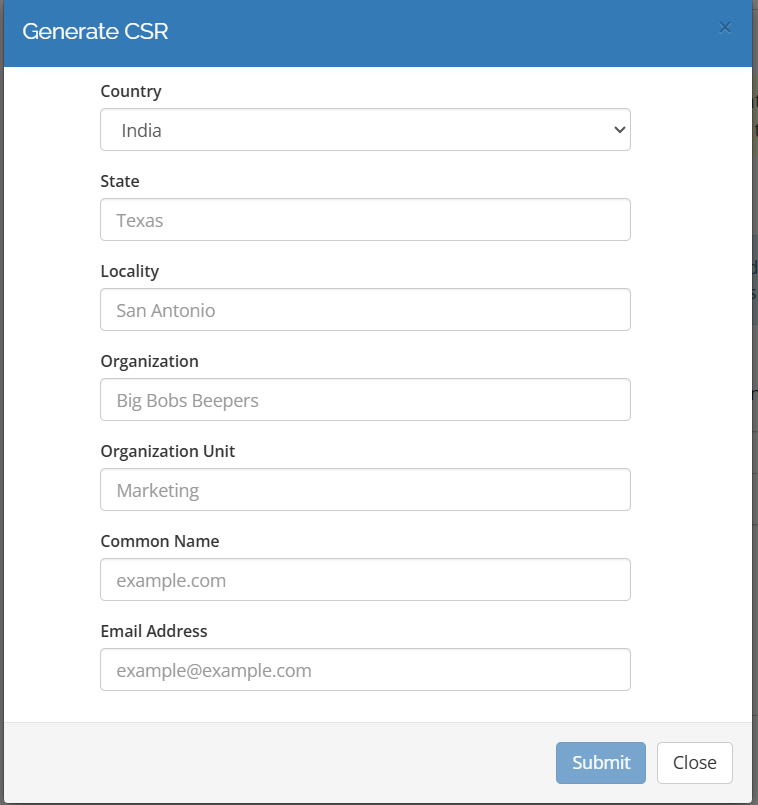
You will now be prompted to enter the required details to generate the CSR. Make sure the Common Name field contains the exact domain name for which you are installing the SSL certificate.
After generating the CSR, fill in the Administrative Contact Information and click Continue. You will then see a CNAME record provided for your domain.
Add this CNAME record in your domain’s DNS settings and wait for it to propagate. Once the changes are active, click Revalidate.
After successful validation, your SSL certificate will be verified, and you will be able to download the certificate files.

Step 4: Downloading the certificate
Step 5: Install IIS on Windows Server
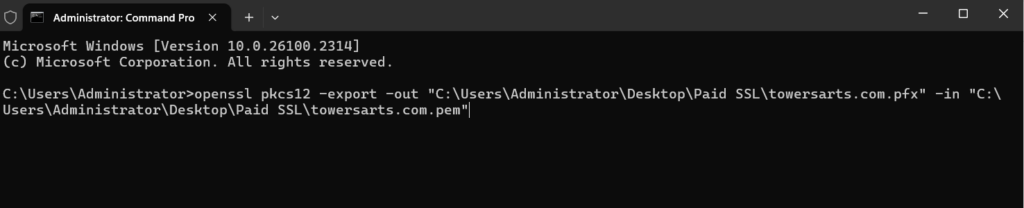
Step 7: Adding the PFX to the IIS
Once the PFX file is generated, navigate to the IIS, choose the connection server and right panel of the ISS you will see a option called Server Certificate.
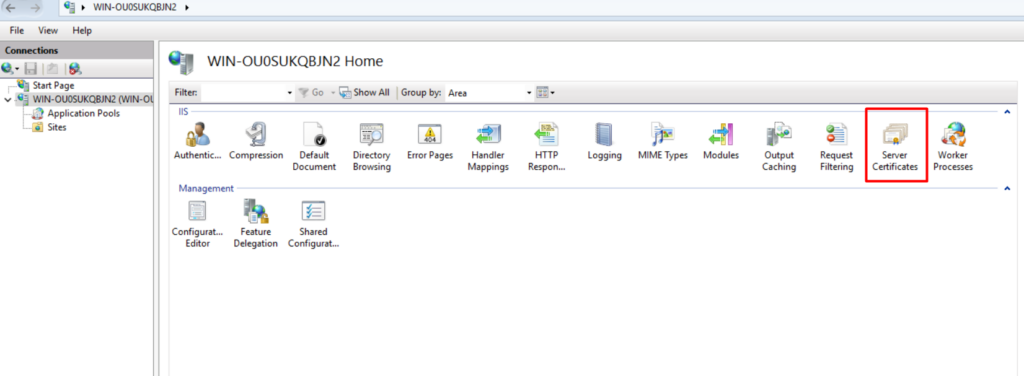
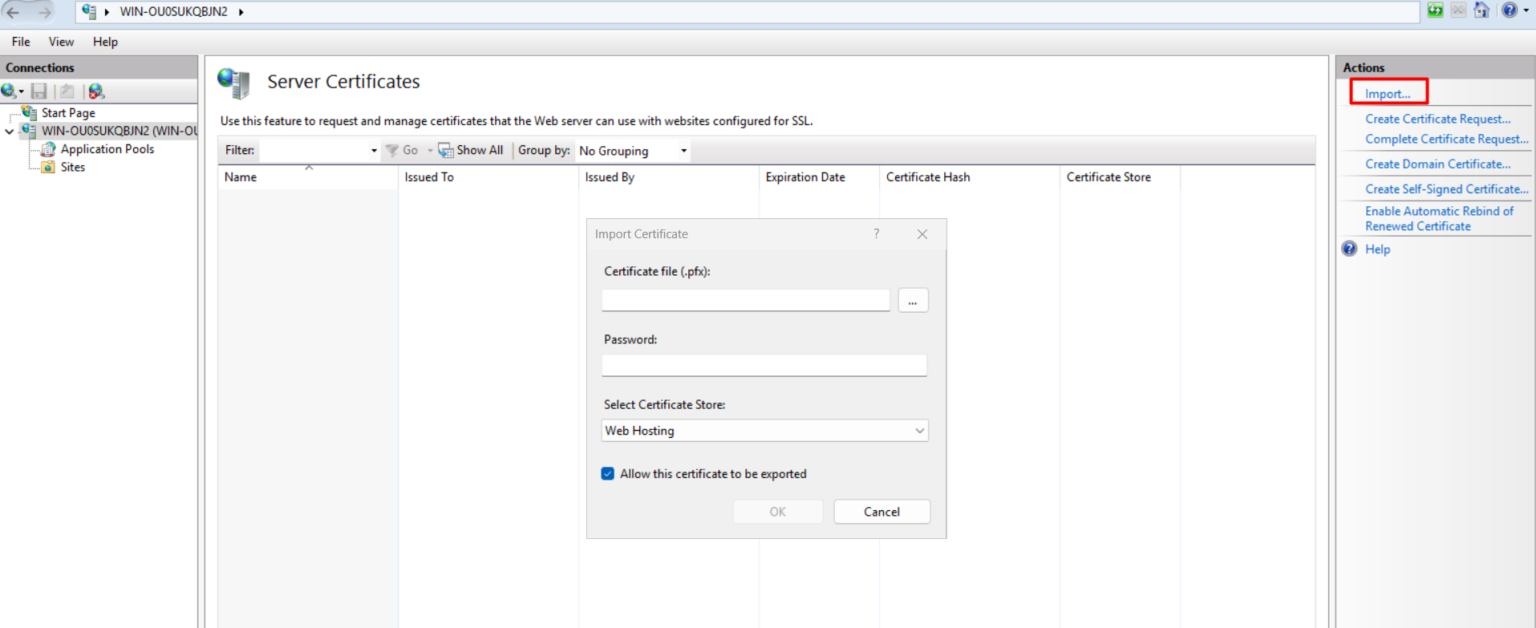
Once you are in Server Certificates in IIS, click on Import.
In the Import wizard, select the PFX file path you created earlier. Enter the password for the PFX file and choose Web Hosting from the dropdown list. Then click OK.
Your SSL certificate will now be successfully imported into IIS.
Step 8: Manual Binding
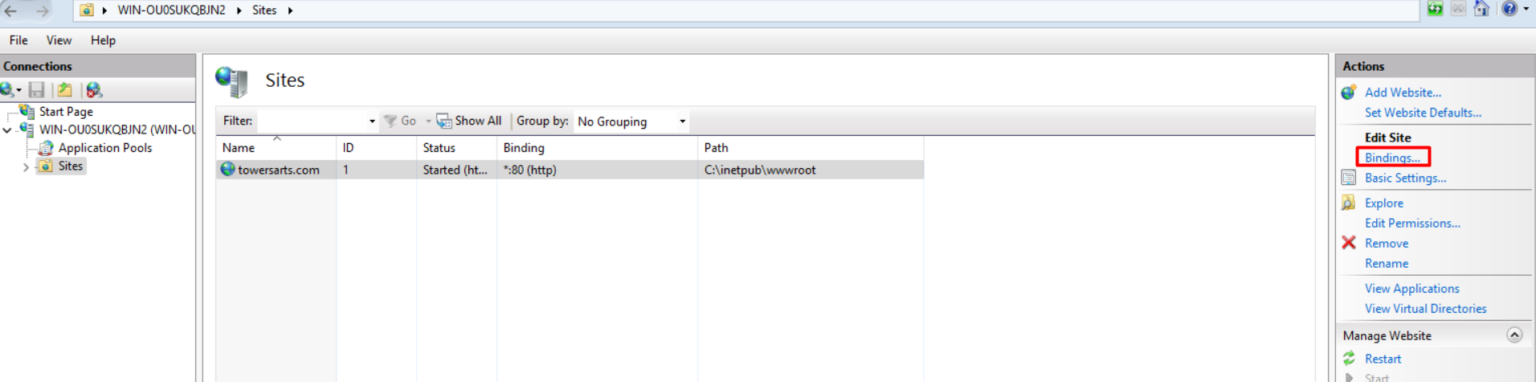
If the sites are not added in the IIS, you can able to add the site in the same page, you will see an option called “add site” in the right panel above the binding. After adding the site you can make the binding to in connect the site to SSL
Video Reference:
Hope this article simplifies your work on install SSL certificate on Windows server easily.